
Seems like winter in the Northwest has been a nasty one this year and it’s not even over. When I was writing up this tutorial it’s was snowing and a few of days before that we had freezing rain. I’m tired of winter and I’m dreaming of spring. Spring means the flowers start emerging; my fruit trees start to blossom and winter goes away. To help fight my winter blues I decided to create this artwork based on a gazania flower that bloomed in my yard last year. To add a new element to the artwork I decided to color the flower with colored pencils. This tutorial will not only explain how to do the pyrography for the gazania flower, but also how to create a colored pencil overlay.

Click on the image to the left to watch a YouTube video version of this tutorial.

Click on the icon to the left to watch a time lapse video of the artwork being created.
Now it’s time to get to work.
Updated Oct 2017 – added a section about finishing or sealing the artwork at the bottom of the post.
Skill Level = 2. (Beginner to intermediate)
MATERIALS NEEDED:
- Writing tip
- Shading tip
- 5 x 6 inches (12.7 x 15.2 cm) piece of wood
- Attached Pattern (enlarge or shrink as needed) Gazania Flower
The below items are needed if you are intending to color your artwork
- Large Eraser, blending tortillion, or blending stump
- Colored Pencils. I used Prismacolor brand in the following: Canary yellow, Yellow-orange, Spanish orange, Grass green, and Dark green.
If you’d prefer a different color for your flower, then use a light, medium, and dark color in that color range. Using a yellow for your light color will work with most other colors as the yellow is for highlights.
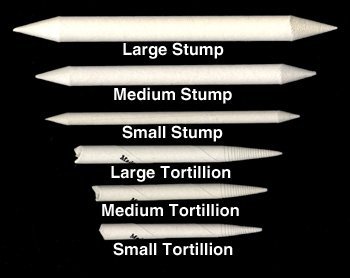
Blending Tortillions or Blending Stumps are paper products that are used to soften and smooth lines drawn with graphite, charcoal, colored pencil, etc. They both work the same, come in an assortment of sizes, and are readily found in any art store (or should be) and numerous places online.
Tortillions are hollow tubes form by a rolled up piece of paper that comes to a point on one end.
Blending Stumps are solid tubes made of paper pulp that have pointed ends.
STEP 1 – PREP THE WOOD

For this project I used a store-bought coat/key holder made out of birch plywood. You do not need to do the same, but I’m trying to provide an assortment of ideas using materials that can be readily found at craft stores. The holder measures 6 1/4 x 11 5/8 inches (15.9 x 29.5 cm).

Before removing the metal hooks, I first marked where the hooks were located on the wood. The reason was I wanted to make sure I avoided those areas when I placed the pattern on the wood.

Removing the hooks.

Next sanded over the surface of the wood with a piece of 220 grit sandpaper. Use caution around the pencil marks as you don’t want to sand them off. Also sanded the edges of the wood.
STEP 2 – TRANSFER THE PATTERN

I use the tracing method to transfer all my patterns to my projects. It’s cheap, easy, and gives me control on what I want to include. Print off your pattern on light weight paper (standard copier paper is perfect), coat the back of the pattern with a graphite pencil (I use one in the B ranges), place pattern on wood, tape in place, and trace over pattern with a sharp pencil.

Before you remove the pattern, slowly lift it up and spot check the trace lines. Look for any missing or hard to see spots. If there are missing spots, lower pattern and trace again, recheck. When all is good remove the pattern.
Side Note – – Todd thought the flower bud was distracting to the work and he didn’t care for it. If you feel the same, then omit tracing the bud onto the wood.
STEP 3 – BURN THE OUTLINE

With the writing pen tip on medium low, lightly burn in the trace lines for the leaves, edges of the flower petals, and the center of the flower. Use a light hand pressure. This will help keep the pen tip from sinking down into the wood surface.

Burning along the outer edges of the flower petals

Within the center of the flower, I drew tiny little circles in that area but just for a small portion of it. I will discuss the flower center in much greater detail later in the tutorial.

Draw circles with the writing tip

For the contour lines on the flower petals, I switched to a shading tip. I went over each line with the flat of the pen not worrying about keeping the contour line super thin.

The Contour Lines are the lines I drew on the petals. They help shape the petal and are also the location of the darker streaks on the petals that will make it look the like the petals have ‘ridges’ so to speak.

I also very lightly burned in the shadows that a couple of the petals had.
 Burn along the contour lines

Finishing up with the shadows and contour lines

After you have burned in the trace lines, rub over the surface with a pencil eraser to remove any residual graphite.
STEP 4 – BURN THE FLOWER PETALS

In this step we are going to do the pyrography portion on the flower petal. I used the shading pen tip and I had the heat on medium-low. For reference, my burner goes up to 10 and I had the heat on 2.5.
Before I discuss the technical aspect of rendering the flower, I need to discuss proper pen tip placement first.
OPTIMAL PEN TIP PLACEMENT – –

NOTICE the placement of the pen tip in this photo; I call this Optimal Pen Tip Placement.
The end of the pen tip is on the inside edge of the flower petal. Positioning the pen tip this way ensures that I am only burning on the flower and not on the background.
If you walk away with only one thing from this tutorial, I hope optimal pen tip position is it. Optimal pen tip position ensures that you are burning where you INTEND to burn and that your borders are crisp/clean.
Turning the wood, when needed, is important to ensure optimal pen tip placement. You can angle your hand in weird positions to accomplish this, but if you’re burning for any duration of time it’s much easier to just turn the wood.

First I darkly burned all of the spots near the base of the petals. There are a couple of petals near the front where you can’t see the spots because of the angle of the flower.

Burn in the dark spots
PULL-AWAY STROKES
When working on the petals, I used pull-away strokes to fill them in. Position the shading pen tip at the base of the petal and pull it away from the base towards the outer edge of the petal following the general shape of the petal and the contour lines. Pull-away strokes can also start from the outer edge of the petal and pull toward the base of the petal.
 Starting a pull-away stroke. Pull-away strokes always start on the darkest area.

Finishing a pull-away stroke. How fast you move your hand determines how pale the stroke will be.
The basics of the petal are: a) color the petal a light tan color, b) darken the contour/crease lines, c) darken the base of the petal, and d) add any cast shadows. I don’t do the steps in exactly that order, but these are the items I’m working on when I burn in the petals
I will show two petals being burning with lots and lots of photos so you can see how I create one. I keep the heat on my burner around medium low, so for this step my unit (which goes to 10) was on 2.5. To darken up contours lines, I burned over the same stroke several times versus turning up the heat. My method takes longer, but for me it produces art that looks more natural or realistic because of the smooth transitions across the petal surface.

Detailed example 1:


 Here’s how the petal looks so far


Detailed example 2:


If I haven’t bombarded you with enough pictures yet, below are progress photos of the other flower petals being burned in.


STEP 5 – BURN THE CENTER

The center of the flower started when the trace lines were burned in. This is where I drew tiny pale circles in the center of the flower, so in this step I’ll explain how I finished rendering the center.

First, using the shading tip, I went around the edges by the base of the petals and burned it darker, but also added some random slightly darker blobs/patches. My goal was to create an irregular texture that has scattered light and dark values.

Continued work.

Next, I burned on the petals just below the dark spots. I wanted to make the dark spots look like they were in a recessed area of the petal. This also made the petal edges stand out more.

Continued work.

Then I re-burned the tiny circles in the center to darken them up and I also expanded the area they filled. I really should have scraped out the first circle I did that ended up almost black. Obviously I didn’t test the pen tip heat level before starting, but too late now.
 Continued work on the tiny circles.

Almost done with the tiny circles.
 If you are not planning on adding the colored pencil overlay, then there is one more step I would do to the center. Along the edge where the shading tip was used, draw a few short slightly curved random lines. This will give it a slight “hairy” look to represent the stamen of the flower. I didn’t do this step with my wood burner as I used a colored pencil to do it.
STEP 6 – BURN THE LEAVES
The leaves are pretty easy to do and there aren’t many of them. I will go into detail for one leaf and those steps would need to be done for the other leaves.
Note the little blotches or dots to the left of the bottom leaf is where I tested the pen tip heat. I knew that spot was safe as it was the location of a hook.

This will be the leaf used in the detailed example.

First burn in the center vein of the leaf. I used the razor edge of the shading tip, but you might find it easier to use a writing tip.

Next darkly burn in the recessed areas. I equate it to hills and I’m burning in the valley between the hilltops.
Below are progress photos.


Then fill in the rest of the leaf, but keep the hilltops the palest part of the leaf. If need be (which I did) darken up the valleys a bit more.
Below are progress photos.


Below are some Progress photos of the other leaves being burned in.


STEP 7 – BURN THE FLOWER BUD

This is the last step for the pyrography portion of the Gazania Flower. I already mentioned that Todd didn’t care for the flower bud. He thought it looked like some weird alien eyeball, but I had already burned it in so it was staying.

First burn in the little leaves around the bud. I outlined each leaf and then filled it in.


 Next I burned in dark lines along the seams and burned the center opening black.

 After that it was a matter of darkening up the sides of the bud with pull-away strokes that started from the bottom and went towards the top.


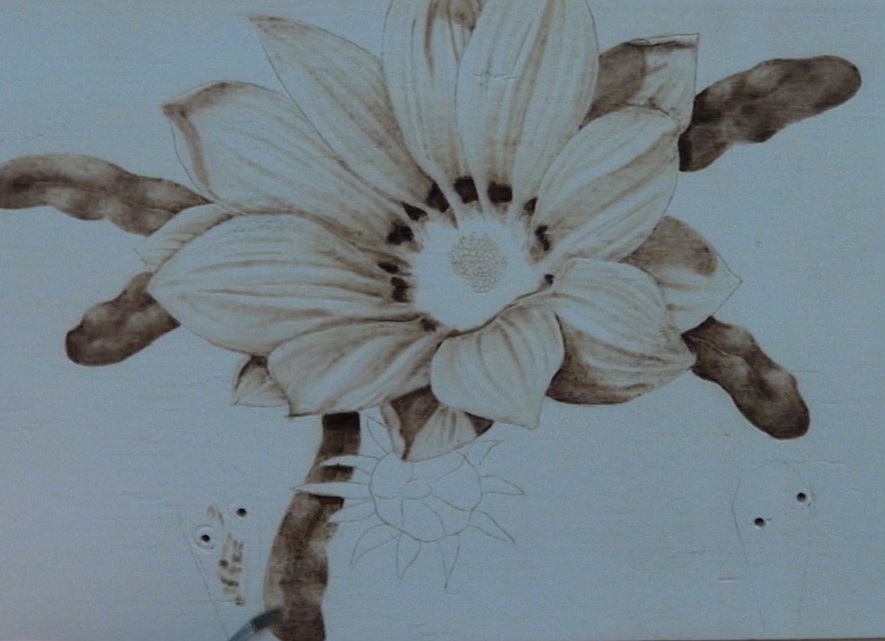
Here is how the flower looks after the pyrography was completed on it.

STEP 8 – COLOR THE FLOWER

We’re almost done. This is an easy process of; 1) go over the entire flower with the yellow-orange (or medium color of your choice), 2) color over the shadows and creases with the Spanish Orange (or dark color of your choice), 3) color the highlights with the Canary Yellow (or light color of your choice).
After coloring the flower, blend the colors with a clean eraser, blending tortillon, or blending stump. All you do is lightly rub the entire surface with the blender of your choice.
To clean an eraser, rub it on a clean piece of paper until there is no discoloration (residual graphite or colored pencil) left on it.

Here’s the flower after I colored it with the Yellow-Orange (medium color) colored pencil.
 Notice how you can still see the pyrography through the color. I’m not applying a heavy coat of colored pencil, just enough to give it a touch of color without losing the pyrography shading.
 Continued work.

Next I used the Spanish Orange (dark color) on the cast shadows, contour lines, and base of the petals.
 I did NOT color over the entire flower with the Spanish Orange. I just colored in the darker areas on the petals.

The dark color intensifies the shadows and helps contour the petal.

Lastly, I lightly colored in the highlights with the Canary Yellow. The highlights are the lightest areas on each petal and are generally found near the top of the petal next to a contour line.

Only apply the light color to the highlights or pale areas on the petals.

Continued work.

Blend the colors.
I used a CLEAN eraser to lightly and very gently rub over the surface. I used Pull-Away strokes. I did not clean the eraser between strokes.
If you use an eraser like I did, be careful near the edges as the erase will push the color onto the background if you don’t lift up soon enough.
If you are using a blending tortillion or blending stump, then just gently rub it over the entire surface of the flower.


 Here is a before and after picture. It’s not a huge difference, but a little of the color has been removed and the streaks of dark orange have been softened a bit.

After I colored the flower I worked on the leaves by coloring each one with the Dark Green colored pencil. I immediately hated how it looked, but I left if for now.

I used a blending stump to smooth out the color on the leaves. I didn’t use the eraser as it was too large for how small the leaves were.

I finished the center of the flower drawing in the stamen (the “hairy” part of the center) by drawing short slightly curved lines with the Spanish Orange colored pencil.

Draw the stamen using a colored pencil by drawing short slightly curved lines.

After I finished the center I asked Todd what he thought. He hated the leaves too. He voiced what I was thinking, they looked like little pieces of bacon.

To correct this I colored them again, but this time used the Grass Green colored pencil. I liked the results a lot better. After recoloring the leaves I used a blending stump to smooth the color.
Blending stump used to smooth the colored pencil on the leaves
I probably should have left the flower alone, but I decided to go over the color again. So I repeated the first 3 steps of coloring the petal. What’s interesting to me is how the flower can change looks depending on the angle and light.
Here’s the photo of the flower is taken straight on

Here the photo it is taken at an angle. The holder was tilted back, so that changed how the light hit it and made the colors deeper.

The flower is done, but I will briefly mention the border around my key/coat holder. While I’m still undecided if I like the border I put one in as I just felt like it was needed. I first went through creating a 4 dash pattern that had a dash angled to each direction of the compass. Then I added a couple of tiny dot lines between each dash. Below are some photos of it and you’ll quickly see my work is not uniform.


Below are some photos of the entire hanger


Finishing or sealing the artwork

Oct 2017 – We discovered that brushing on a lacquer finish smears the color pencil, so use spray finishes to avoid this problem.
IN CONCLUSION
I hope you enjoyed this tutorial and found the colored pencil to be a welcome addition to the project. While this wasn’t one of my more complex projects, I do enjoy the bright color of it. Especially as I look out the window and see the snow that has piled up. I can’t wait for summer.
What do you think about this project? Let me know. I welcome feedback (good and bad) as that is the only way I will discover how I’m doing and what improvements I can/should make. It’s also the only way I’m going to know what sort of projects you’re interested in.
Now to answer a couple of questions I get asked frequently. This artwork was burned on Birch plywood and measures approximately 5 x 6 inches (12.7 x 15.2 cm). It took me 3 3/4 hours to complete the artwork, and approximately 2 1/4 hours of that time was doing the pyrography on the flower. That said this is not a race or contest. I only put how long a project takes me as I get asked that question a lot. You may get this done faster or slower, but that’s irrelevant. What’s important is the process of creation and learning from the process.
Brenda
Originally posted: Feb 11, 2017
Updated: Oct 2017
Goodness Gracious Brenda!!!
This is a magnificent tutorial. Each and every detail is explained so well, it leaves me astonished not only at your burning expertise, but your colouring is equally amazing. Thren to top it off, the masterful way you put together the whole tutorial together with lovely clear photos as well as the most precise wording to explain exactly what you did, leaves me in wonderment.
Do you have any time ever to cook, clean, shop or even look after the garden ?
Every which way I search for anything Pyrographical, there you pop up, outdoing any other person who even attempt it!
God Bless, specially for the free sharing of your talents!!
Elise
Hi Elise,
thank you for such a wonderful compliment. My husband is great for helping with the daily chores that have to be done. Plus I was terrified to actually upload a video to youtube, so kept putting it off. By the time I finally uploaded my first video I had 2 years worth of projects. So I don’t have to create new content each week and that helps a LOT!
Pyrography has become my passion and I love what I’m doing. It’s a lot of fun sharing what I do with others and helping encourage people to try the artform. I also love seeing how quickly people’s artwork improves and the wide range of artistic level out there. Plus it’s always interesting to me to find out which subjects people choose to burn.
Thank you so much for your wonderful comment!
Brenda
Thanks for such a detailed posting about this technique; it was both very informative and inspirational!
Hi. Thank you very much. Brenda