 In this tutorial I’m going to explain how to create straight hair as viewed from the front of the face. Creating realistic hair can seem a little overwhelming. My goal is to show you how to breakdown the hair into smaller sections that make it much easier to replicate.
Before we get started, I want to mention that hair is not the focal point in portrait artwork. Instead, the face is the focal point. More specifically, the eyes, nose and mouth are the focal point. The focal point is the area you want to viewer to first notice. The hair frames the focal point. The further from the face you are, the lest detail and texture is needed. Doing this will help keep the facial features as the focal point and help give your artwork depth.
In this tutorial I am making the hair a lot more textured and detailed than it truly needs to be. There is nothing wrong with that. I just wanted you to be aware that this level of detail isn’t absolutely necessary.
 Click on the image to the left to watch a YouTube video version of the tutorial. Or click on this link: https://youtu.be/l6hg7-diwLM
Let’s get started.
MATERIALS NEEDED:
- Writing tip
- Shading tip
- 4 x 6 inch (10.2 x 15.2 cm) piece of wood*
*I am burning on watercolor paper for this demonstration.
The specific brand is Legion Stonehenge, it’s not bad for burning on. Plus, it’s cheaper than my favorite brand of watercolor paper. Here’s an Amazon link: https://amzn.to/3ntPLoY
My favorite watercolor paper to burn on is made my Winsor & Newton. Here’s an Amazon link to that brand: https://amzn.to/3yv0NAw
Please note that all of the product links in this tutorial are Amazon affiliate links. This just means that if you use one to purchase an item, then I get some small amount of the sale.
REFERENCE PHOTO
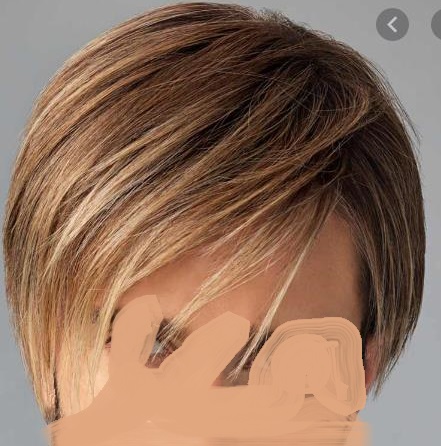 Here’s the reference photo I’m using. It is something I got off of the internet a number of years ago, and I electronically painted over the facial features to avoid copyright. Since I got this off of a google search versus a website, I don’t have a url to the source photo.
As you can see, the hair in the reference photo is blonde with some light brown areas. You can make the hair darker or lighter by either increasing or decreasing the color of your burn strokes.
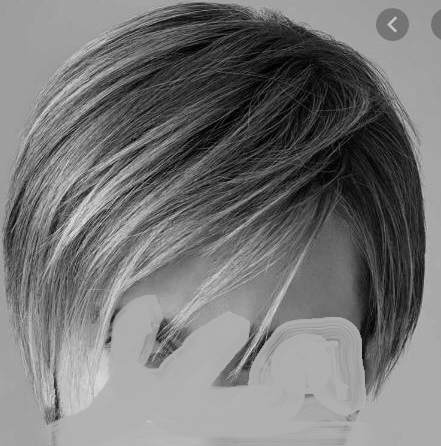 Some people prefer to work with black and white photos, so here’s is that version.
NOTE – there are not anymore images in this blog. Eventually I will restore them.
STEP 1 – PREP SURFACE FOR BURNING
If you are burning on watercolor paper, there is nothing that needs to be done. If you are burning on wood, then do the below steps. I do these steps on ALL of my boards including plywood.
Wood burning is much easier if you take the time to prepare the wood surface. Always smooth the wood surface by sanding it with at least 220 grit sandpaper.
Then thoroughly wet the board by misting it with water or running it quickly under the sink faucet.
The board should be damp to the touch, but not soaking wet.
Let the board dry and then sand again.
This piece of plywood board is broken up into three sections. The far-left section is how the board looks without any prep work. The board has a rough texture. The middle section of the board shows how it looks after it was sanded, and the surface is a lot smoother. The right section of the board shows it after it was lightly misted with water and allowed to dry. Notice how rough the board looks, but a quick sanding will remove that and leave an ultra-smooth board.
Doing the 4-step process (sand, mist, dry, sand) produces a super smooth surface, and the smoother the surface is the better the burn results will be.
STEP 2 – TRACE LINES & SET UP
I print out the image on plain copier paper. I flip it over and coat the back side with graphite. In this photo I’m using a piece of compressed graphite in stick form. I using a pencil extender to hold the graphite so I don’t get my fingers dirty.
I only coat the image area, or the area I plan to trace.
If I have problems seeing the image through the paper, I draw a line around the area I want to trace so I know where the graphite needs to be applied.
I did not record myself tracing the image. Here’s a of my tracing.
I traced the general shape of the hair.
I traced the location of the dark shadows and major sections of hair.
I also traced some of the pale highlights.
It’s important to remember that you don’t have to mimic everything I did. I just do my best to explain how I created the artwork, and you can choose what aspects to incorporate into your own art.
Before we begin, I want to talk about my set up. I keep a piece of scrap paper nearby to test out the heat of the pen tip.
I also use it to blot the pen tip before I resuming burning after any pause. If you are burning on wood, you should have a piece of scrap wood nearby for the same reason.
I also keep the reference photo nearby. I didn’t take a photo of that, so I’m using a photo from another hair demo.
Place the reference photo so that you can easily see it at all times while you’re burning. If you are right-handed, the photo should be placed to the left or above the artwork.
Once the heat is set, start burning on or near the trace lines. I like to burn adjacent to the lines that represent pale highlights.
For the majority of the hair, I am burning over or on the trace lines. In the shadowed areas I use the flat of the shader to get wider burn strokes.
On the sides where the sections of hair get thinner, I tend to use the edge of the shader. This produces thin burn strokes. I writer pen tip can also be used.
Since I want the hair to be a dark blonde color, I’ve got the heat set on my burner to get a medium to tan burn result.
Finishing up.
Here’s how the hair looks at this point.
Once the trace lines have been burned in, then rub a pencil eraser over the area to remove the graphite.
I’m using the Vanish brand of eraser, but any pencil eraser will work. Here’s a link to the brand of eraser I’m using: https://amzn.to/3Adt3J4
Here’s how the art looks after the pencil marks were erased.
STEP 3 – RIGHT SIDE
We’re going to begin with the right side.
This side is in shadows, so it’s a bit darker than the left side. There are 4 features to be aware of.
First, there is a shadow along the top of the hair. This makes the top of the hair darker than the bottom.
Second, there are several pale highlights in the hair.
Third, you can see a bit of the hairline along the side of the face.
Lastly, there are some stray hairs sticking out along the back of the head.
Now let’s break down the hair into smaller sections. I chose to break it down into 3 sections.
The front section that includes the hairline and the shadowed triangular shape.
The middle section that contains the majority of the pale highlights.
The back section that is behind the last pale highlight.
Let’s start with the back section.
I like to work on the darker areas first, so I started burning shadowed area near the hair roots.
Using the flat of the shader, fill the area with color that is dark tan or light brown in value.
As you can see, the color does not need to be uniform.
Because this area is in shadows and near the back of the head, it doesn’t need much if any texture or detail.
Next, burn in the triangular shadow on the front section of hair.
Because this area is closer to the face, I want it to have a bit more texture. I’m burning a series of lines that vary in width. The lines are not razor thin, so they don’t really stand out. This is a subtle texture. I will also mention that this is a way to get darker burn results.
Next, I burned the rest of this section to a tan color.
Along the hairline, burn several thin darker lines than angle downward. Make sure to leave little gaps between the lines.
Fill in the bottom portion of the hairline so that it is several shades darker than the adjacent pale highlight.
I did bounce around a little, but I think you’ll still be able to follow along.
With the middle section darken up the root area. The fill the section with a tan color. Afterwards, burn some thin darker lines to break up the section into smaller locks of hair.
Repeat this process on the entire middle section of hair.
The lines to create locks of hair can be done first. For example, in this photo I’m burning a thin line adjacent to where a pale highlight lock of hair is located.
Then I extend the color a little way to help the highlight stand out.
Lastly, I burn over the highlight making it a tan color.
You can create a many or as few pale highlights as you want.
Here’s how the hair looks so far.
Once the basics of the hair are in place, then re-burn to further define locks of hair.
Also, re-burn over the area to darken the hair as needed.
Looking at this photo you can see a number of pale highlights or small locks of hair. Each one is created the same way:
- Burn a line along the outer edges of where the lock or pale highlight is.
- Darken the hair adjacent to the lock or pale highlight to make it stand out.
- Burn over the lock or pale highlight until it is the desired color.
The order the steps are done can vary. For example, you can burn the hair to a base color. Then add some darker burn strokes to create the impression of locks of hair. Afterwards, burn along the outer edges of where a pale highlight is desired.
Continued work fine-tuning the hair.
Here’s how it looked once I was done.
I decided I make my hair too dark, so I’m using an ink pen eraser to remove some of the color. Ink pen erasers are also called sand erasers. Here’s a link to an ink pen eraser on Amazon: https://amzn.to/3bxob7n
The ink pen eraser removed a little of the color.
Often, it’s necessary to add a few details back in after using the eraser. This photo just shows that I’m burning along the hairline to restore it.
Don’t forget to burn a series of lines that vary in width and length along the bottom edge of the hair. This will give the hair a tapered appearance.
Lastly use the edge of the shader to burn a few thin lines representing the stray hairs sticking out.
STEP 4 – LEFT SIDE
Now we will work on the left side of the hair, or basically the rest of the hair.
Looking at the reference photo, a number of pale highlights are visible.
A green circle marks the location where the sun is striking the hair.
This area of reflected light is the overall palest area on the hair.
The top right side of the hair is darker than the rest of the hair on the left side.
There are a number of sections of hair. I’m not going to number them like I did the right side.
There are also a number of shadows. The shadows are often what I use to mark the boundaries of the different sections of hair.
I’m starting with the triangular shaped section of hair on the top of the head. I’m using the flat of the shader to burn wide strokes that vary slightly in color.
Each burn stroke starts on the right edge where the color is darker, and gets pulled towards the left where the color is lighter.
Be aware that since my burner isn’t set on a very high heat, I am re-burning over the area several times to build up the color.
Next, I burned just below the triangular section of hair to define its lower edge.
Then I added more burn strokes to the triangular section of hair.
Now I’m burning in the dark shadowed area above or slightly to the left of the triangular section of hair.
Yes, I bounced around a lot while working on the left side of the hair. I tend to burn in the darker areas first on all of my artwork. I find that this makes it easier to match features with the reference photo.
Next, I burned in the slightly shadowed section near the bottom of the hair.
I continue to burn in the shadowed and/or darker areas on the back section of the hair.
Then I started burning over the back section of hair.
I start the strokes on the right where the color is darker, and pull the pen tip towards the left where the color is lighter.
A reminder that I reburn over an area several times to build up the darker color. The darker the color the more I have to reburn.
Once the section has some color, then I angle the pen to burn thin darker lines with the edge of the pen tip. These lines create small locks of hair within a section.
I work on a section of hair for a bit, then I often return to a previous section and do more burning on it.
There isn’t a particular reason for this. Instead, it’s just a way to make the project less monotonous. All that I’m during is creating long bands of color that vary in width, color, length, and sometimes direction. It’s nowhere near as monotonous as creating large areas of uniform color, but it still gets a bit boring. 🙂
The hair in front of the triangular section curves towards the left. I will refer to this section as the comb over.
Begin by burning a darker stroke that starts in the shadows adjacent to the triangular section.
Extend the burn stroke making sure to angle it as the reference photo shows.
Hair is just like fur; it needs to be burned in the direction that it is hanging. Or, in this case, styled.
Filling the comb over section with wide burn strokes that vary a little in color.
I’m creating a lock of hair in this section by burning a darker thinner line adjacent to where I want the lock of hair to be.
The pale band of color will contrast with the adjacent darker burn strokes, and that creates a lock of hair.
Yes, it is that simple to create a small lock of hair within a section of hair.
Seriously, it is that simple.
This photo shows that you can create different sizes of locks. It is all controlled by where you place the darker burn strokes.
I’ve returned to the back section of hair. I further define locks of hair, burn over pale highlights to give them a base color, and darken the section as needed.
As I said before, I do a fair amount of re-burning to build up the color.
For blonde hair, keep the heat on your burner set to achieve a medium to dark tan burn result.
Burning at a lower heat will reduce the chances of dark blobs from happening when you first start burning.
Also, the lower heat will ensure that pale highlights remain pale.
A reminder that the further from the face the hair is, the less detail it needs. Reducing the detail will help push the area into the background.
Here’s how the hair looks so far.
I’m burning a series of thin slightly darker colored lines along the bottom edge of the hair to create a tapered edge.
Then I’m back to working on the darker areas of hair adjacent to the triangular section.
Burn a thin darker line along the edge of the triangular section. This will create a clearly defined the boundary on this side of the triangular section.
In this photo I’m burning several darker thin lines in the section of hair behind and slightly below the triangular section.
Then I use the flat of the shader to create wide burn strokes that vary slightly in color. These burn strokes create the vague impression of locks of hair within the section.
Afterwards, I use the razor edge of the shader to burn thin darker lines to clearly define locks of hair and/or the boundaries of hair sections.
I continue to this process as I burn over the hair towards the back of the head.
I’m working my way forward towards the face.
Starting on the back of the hair is a good thing to do because it let’s you practice in an area that isn’t as noticeable.
Next, further darken the hair in front of the triangular section.
Also, burn some curved strokes in the comb over section.
As I said before, I personally like to work on darker areas first.
The darker areas make it easier for me to compare my artwork with the reference photo.
Some of the shadows are pretty long on the hair. It takes me a number of times re-burning over the same area to create them.
I’m using the edge of the shader to burn a thin darker line along the left edge of the shadowed area on the comb over. This will define the left boundary of the comb over.
Burning in darker areas on the hair adjacent to the triangular shaped section of hair.
Adding some darker burn strokes to the section adjacent to the comb over.
Continued work. These darker wide burn strokes create shadows that break up the section into smaller locks of hair.
Here’s how the hair looks at this point.
I’m back to blocking in the hair around the triangular shaped section of hair.
I use the flat of the shader to create wider burn strokes that vary in color. They also vary in width.
Once the hair adjacent to the triangular shape was block in, then I burned over the tapered left end of the triangular shaped section of hair.
Afterwards, I used the razor edge of the shader to burn thin darker lines along the tapered in of the triangular section of hair. This was done to help the end of the hair blend in with the adjacent hair.
In fact, I added a number of thin darker lines in the area. Notice how the lines vary a little in color, and that none of the lines are super dark.
Then I finished burning over the triangular section of hair to give a base color and some texture.
Next, I burned some wide strokes of color on the comb over.
I did mention I bounced around a lot as I burned in the hair.
Using the edge of the shader creates thin lines. Burn thin darker lines along the outer edges of where a smaller lock of hair is desired.
The comb over is much closer to the face, so it needs more detail than the back of the hair does. To me more detail means increasing the tonal variety, and creating more very clearly defined locks of hair within the hair section.
I added a few more stray hairs along the right side.
Quite truthfully, these hairs are not necessary, but I love adding as much detail as I can. The ironic thing is that I doubt most people will ever notice it. I know they are there and it makes me feel better about the artwork. I feel it is important to be as happy as you can be about the artwork you create.
Then I burned a little more on the triangular shaped section of hair.
Back to the comb over.
I know, I’m bouncing around a lot. For some reason I tend to get bored quickly when doing the same basic burn strokes over and over. Bouncing around the artwork makes it a little more interesting to me so I don’t get as bored.
Adding more locks of hair to the triangular section.
Burn over the taped end of the triangular section until it is similar in color to the adjacent hair. This will help the tapered end blend in with the adjacent hair.
Here’s how the hair looks at this point.
ALTERNATE WAY TO CREATE or RESTORE LOCKS OF HAIR
There is another way to create or restore pale highlights and small locks of hair. This is done by using the edge of a shape knife and gently scraping away the burn marks where you want a pale highlight or small lock to be.
This photo shows the before and after of my highlight creating process.
REFLECTED LIGHT
During the photo analysis section, I mentioned that there is an area on the hair where the light strikes it. This area has the lightest overall color on the hair.
Begin by using a pencil to draw a line around the area where the light is striking the hair.
Here’s how my pencil lines looked.
After the reflected light was marked, I re-burned over the hair above the line to darken it a little.
Then I continued to block in the hair using the same guidelines we’ve been using. Once an area is blocked in, then I re-burn over the hair below the reflected light area to darken it slightly.
I tend to work small areas at a time concentrating on the darker hair first. I’m also working my way from the back to the front, but I don’t completely stick with the work flow direction.
When starting a new area, I generally begin by using the flat of the shader to create strokes of color that vary in width and color.
The majority of color variety comes from re-burning repeatedly until the lock of hair or shadowed area is the darkness that I desire.
Continue to work your way forward on the hair. Each new section of hair begins by burning around the outer edges of it to define its boundaries.
Take your time. Rushing to finish artwork never produces the best results.
This demo measures 2 ½ inches square (6.35 x 6.35 cm), and it took me a little over two and a half hours to complete it.
In this photo you can see two small sections of hair that I’m defining. Defining is done by both burning a thin line around the outer edges of the section, and darken up the hair adjacent to the section.
Examining the reference photo, we can see that there are a couple locks of hair that overlap on to the adjacent hair. I drew yellow-green lines over most of the overlap locks of hair.
Be careful to avoid burning over these sections when working on the adjacent hair.
I am creating a shadowed section hair that goes under another section that I will refer to as the top section. I carefully burn above and below the top section as I work on the shadowed section of hair.
I suppose you could create or restore the top section by scraping it into existence after the shadowed section is done, but I find it is faster to avoid burning over the top section.
Plus, depending on how dark the shadow section is, it might not be possible to remove enough color without creating a noticeable gouge in the wood. Since I’m burning on paper, there is a good chance that I would create a hole in the paper.
With the darker hair in place, the top section of hair looks like it is sticking out a little way from the head.
Starting to block in another small section of hair.
Lightly burn over the top section of hair.
It is important that this section be lighter in color than the adjacent hair. The lighter color will make it appear elevated.
Adding more thin darker lines to define the area and give it more texture.
Creating smaller locks of hair within the top section. Notice how the thin darker lines do not need to be super dark. Instead, they just need to be dark enough to be seen.
Continuing to add thin darker lines in the area.
Defining a small section of hair along the lower side of the head.
Creating texture and locks within this section of hair.
Continued work.
Here’s how the hair looks at this point.
I felt that the triangular section of hair on my artwork needed to be darkened up slightly.
Also, I darkened the root area of the sections of hair on the back of the head.
And I added a little texture.
This is actually an example of me being detail obsessive because what I’m doing is not necessary. The less detail and more uniform the color is on the back of the hair, the further into the background it will appear.
Working on a long shadow found along the edge of the comb over.
Like I mentioned before, I prefer to work on the darker sections of hair first. The darker areas make it easier to compare my artwork with the reference photo.
Continued work.
I’m getting very close to the face, so I’m increasing the tonal variety in the hair.
One way I to increase the tonal variety is by pulling and pushing the pen tip.
The reason is that your hand pressure will be slightly different. I tend to use a slightly heavier hand pressure when pushing the pen tip, and this impacts the color of the burn stroke.
Pulling means that I’m pulling the pen tip down towards myself or towards the bottom of the hair. Pushing means that I’m pushing the pen tip up away from myself or towards the top of the hair.
Blocking in an area of darker hair on the comb over.
Continued work.
Defining the edge of a pale highlight lock of hair.
Creating locks of hair within the comb over by burning strokes of color that vary in width and color. These locks are not clearly defined. Instead, they give the impression of locks of hair within a section.
Continued work.
This is another example of a lock of hair that overlaps onto nearby hair. This is easy to handle, just carefully avoiding burning over a lock of hair while working on the shadowed area above and below the overlapping lock.
Extending the shadow.
Working on the hair found on the side of the head.
Continued work.
With the comb over, I’m incorporating a lot more tonal variety into the hair. This will help the hair appear closer to the viewer.
Giving an individual lock of hair clearly defined edges.
As you can see, my burn strokes are not very dark. I’ve got my burner set to get a medium to dark tan burn result.
If I want a darker colored burn, I’ve got two options: 1) Re-burn over the area. 2) Slow down my hand speed. Both options work and I often use a combination of both. I will slow down my hand speed and re-burn until the desired color is achieved.
Defining small locks of hair in the section.
Adding thin darker lines to the comb over. This creates more tonal variety and gives the impression of more locks of hair.
Breaking up the section of hair hanging down over the face, or where the face would be.
Here is how the hair looks.
The hair is essentially done, but I always find something to fine tune. Currently I’m re-burning over the triangular section of hair to darken the area where it ends and the rest of the hair begins.
I also darkened the root area on the triangular section, and on the adjacent section behind it.
Once you’re done with the hair, then use a pencil eraser to remove the pencil marks.
Here’s how the hair looks.
Lastly, if needed, use an ink pen eraser and gently rub over the highlight area to remove a little color. Ink pen erasers are also called sand erasers.
Here the final artwork. You can see there is a faint highlight where I used the ink pen eraser.
PROCESS RECAP
I want to recap the guidelines and basic process creating hair.
- Break the hair down into smaller sections
- Work one section at a time
- Always burn in the direction the hair is styled
- Define the edges of each section of hair
- Fill each section of hair with burn strokes that vary in color and width. This will create the impression of locks of hair within the section.
- Add some clearly defined locks of hair. The further from the face you are, the fewer clearly defined locks of hair there should be.
- A clearly defined lock of hair is created by burning thin darker lines along the outer edge of where the lock of hair is desired. Then darken the adjacent hair, so the lock stands out.
- Increase the detail the closer to the face you are. Increased detail means there is more tonal variety, more clearly defined locks of hair, increased contrast, and more thin darker lines.
IN CONCLUSION
I hope I was able to breakdown the process of creating hair so it was easy to understand and replicate. I often think that we when first look at an object, like hair, there is so much going on that it can be overwhelming. Feeling overwhelmed makes it difficult to decide how to begin. I find that breaking the subject down into smaller sections makes a project easier to manage and a lot less intimidating.
Did my hair turn out picture perfect? No. It is more than sufficient for portrait work. Afterall, the hair is not the focal point in a portrait.
Until the next blog,
Brenda
August 1, 2023
Want to subscribe?
- Click on the “Leave a Comment” field at the end of any post (blog) and a subscribe option will appear.
- Put something in the comment field (if you put “test” or “just subscribing” I won’t make your comment public)
- Fill in the sections for your email address and name, and then click on the “notify me of new posts via email.”
- You will get a confirmation email from WordPress confirming you want to subscribe.
- Click on the confirm button in that email and you’re done.
Please note that I do not send out emails. If you have a WordPress account there is a way to subscribe within the WordPress system, but I cannot provide specifics on how it works as I don’t know.