In this tutorial I’m going to explain how I clean and care for my pyrography pen tips. The information in this blog can be used on all pen tips regardless of the brand. I’m not going to tell you that my method is the best or only method to use. Instead, I will present some cleaning information, including the manufacturer’s recommendations, and you can decide what you are comfortable using.
 Click on the image to the left to watch a YouTube video version of the tutorial.
PREPPING NEW PEN TIPS
Let me state right up front, that you do not need to do anything to get brand new pen tips ready for use! They come from the manufacturer ready for immediate use.
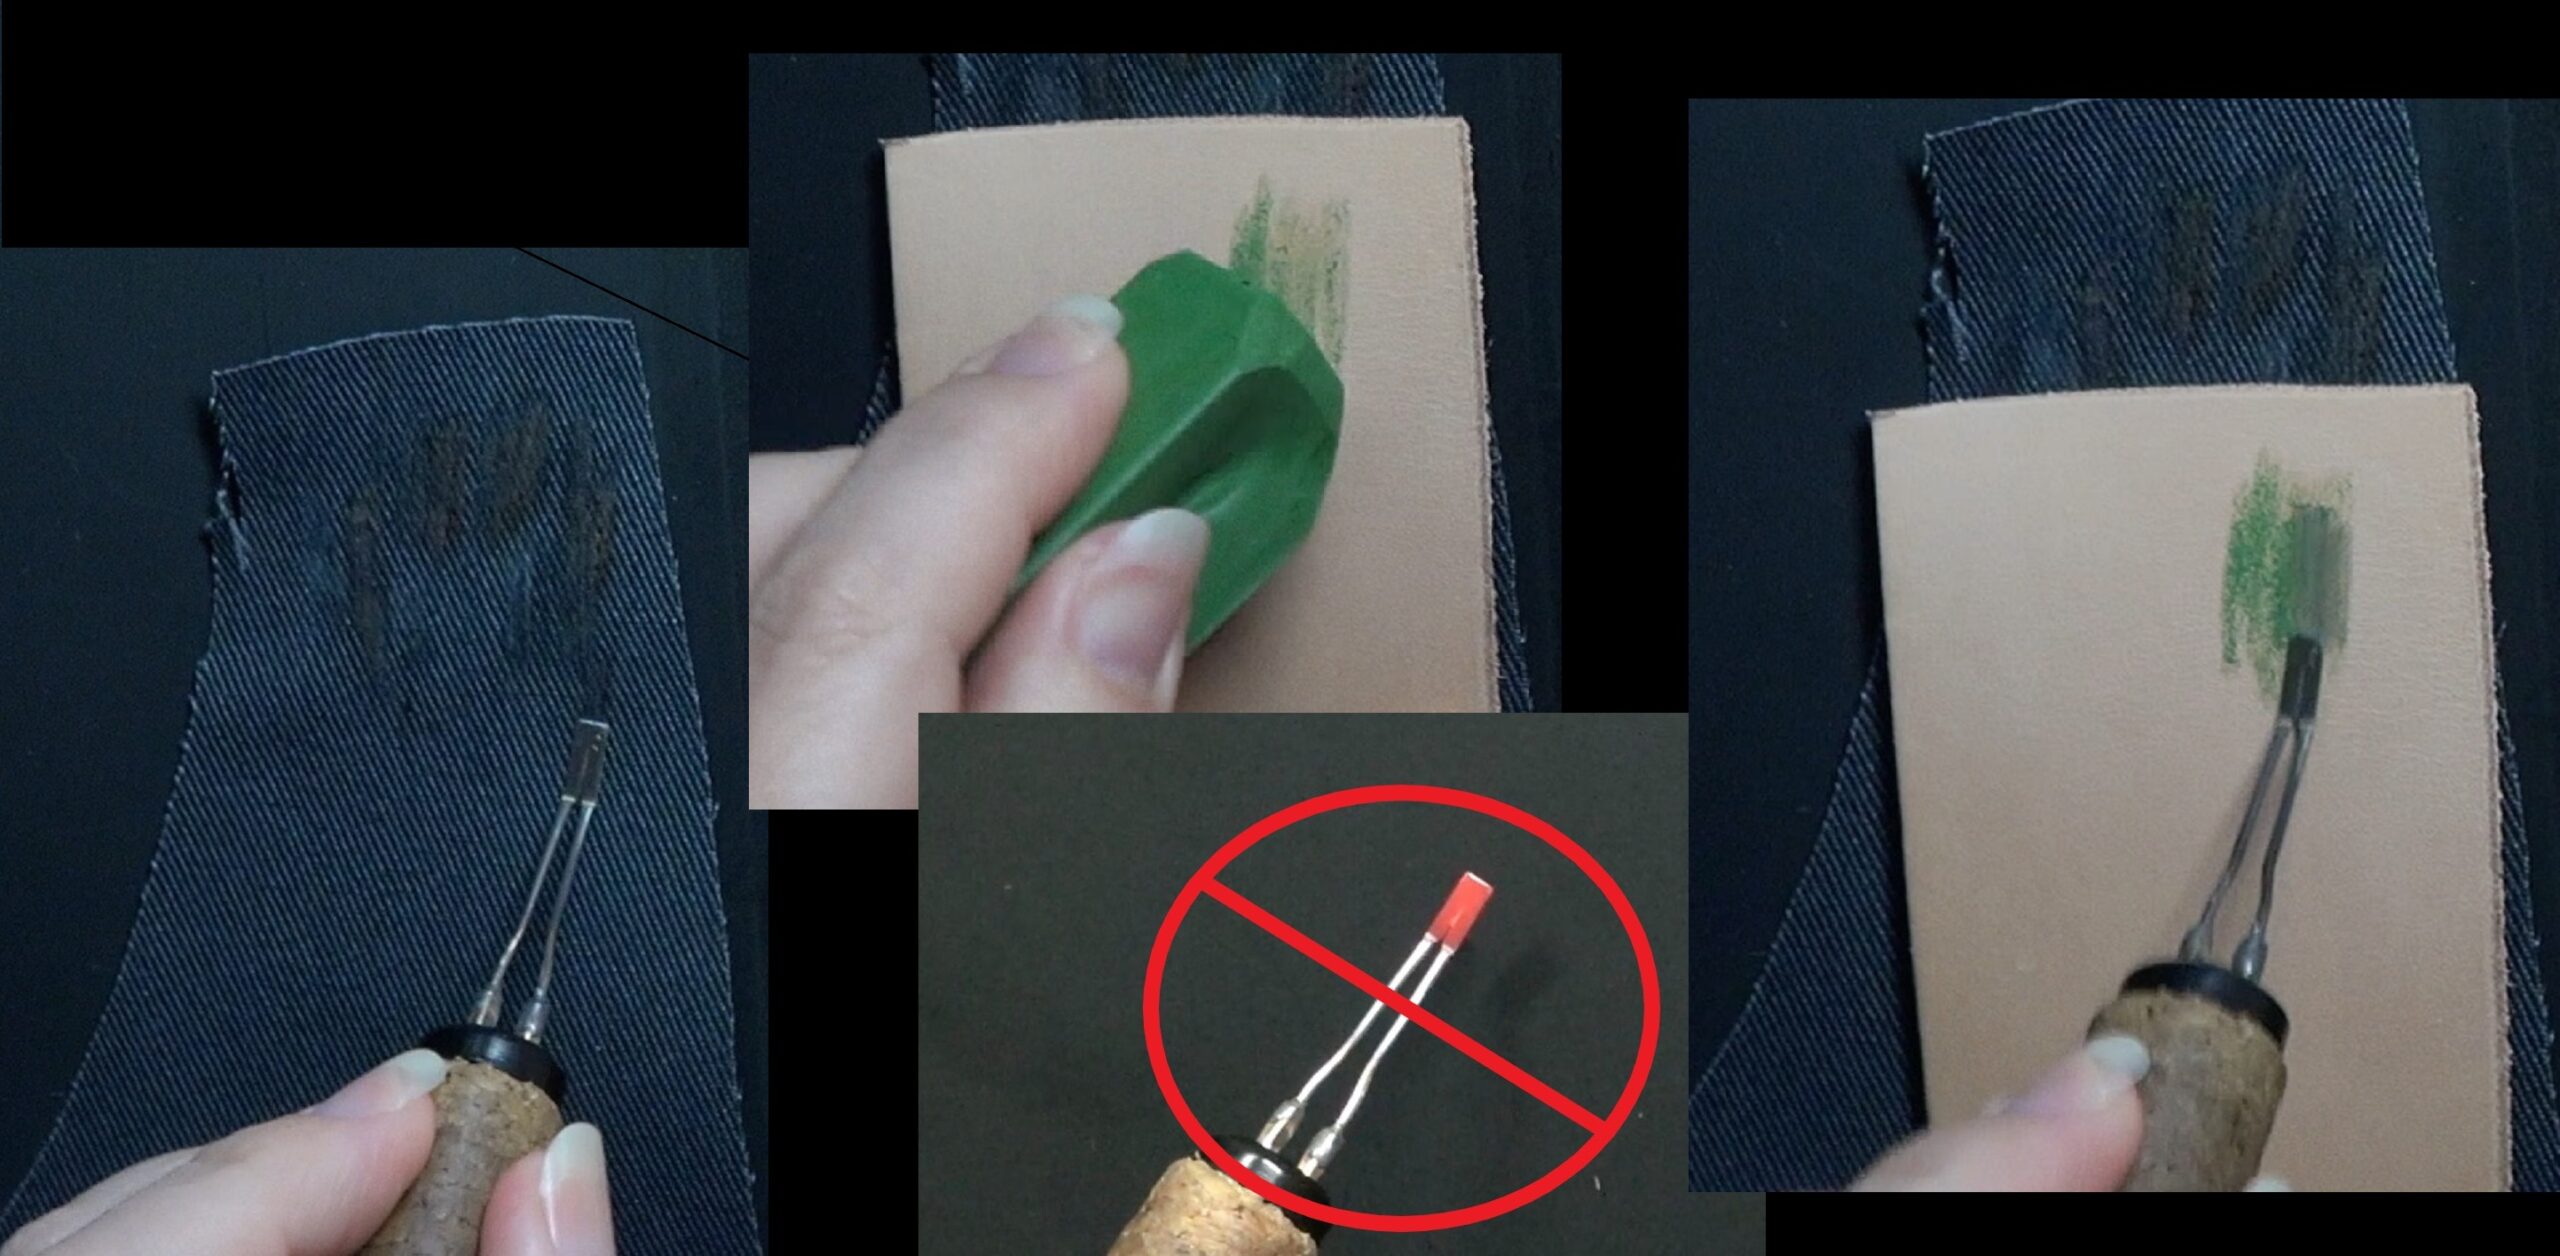
 I only bring this up because I’ve seen several different YouTube videos instructing viewers to heat their new pen tips until they glowed red, and keep them in that state for a bit. One said to turn the machine as high as it would go and let the pen tip glow for 60-90 seconds. That pen tip was glowing yellow by the end of the allotted time.

Don’t do this!
 I’m not sure what this is supposed to do. One YouTuber said the purpose was to condition the tip, but I have no idea what “conditioning the tip” means.
Another said it was to anneal the tip, but annealing is the process of softening metal to make it easier to work with. I seriously doubt that reducing the hardness of a pen tip is going to provide any pyrography benefits.
 If you’d like to read about annealing, I found an article by Mead Metals that goes into greater detail and explains the difference between annealing and tempering.
Here’s a link to the article: https://www.meadmetals.com/blog/what-is-the-difference-between-tempering-and-annealing
 What heating the pen tip to cherry red will do is discolor it. Image 1, found on the left of the yellow line, is how the pen tip looked before I heated it up. Image 2, found to the right of the yellow line, is how it looked afterwards.
Because I like to be thorough, I also checked with several different manufacturers to see what they have to say on the subject. Plus, I wanted to see if I could locate the source of the pen tip prepping disinformation.
After spending a considerable amount of time pouring over numerous manufacturer website, I could not find one one manufacturer who said that there was anything you need to do to prepare the pen tips before you use them! Two of them, Optima and Razertip, specifically stated that you should not heat the pen tip in an effort to anneal it.
Below is what I found, including links to sites and/or articles. The manufacturers are listed in alphabetical order.
BrennPeter
I couldn’t find any information about preparing, cleaning, or caring for the pen tips or burner.
Here’s a link to their website: http://www.brennpeter.com/
Burnmaster
I found the manufacturer’s website, but couldn’t find anything on it that provided information about cleaning, caring, etc., for the burner or pen tips.
Here’s a link to their website: https://mastercarver.com/
Colwood
I couldn’t find anything about the need to prepare a pen tip for burning. The best I found was, “Do not turn the temperature setting all the way up to burn off the carbon, because repeated extremely high temperature will cause the tips to wear out quickly.”
Here’s a link to their pdf file I got the quote from: https://woodburning.com/pages/woodburning-helpful-hints
Optima
“NEVER turn your power supply on high to ‘anneal’ a tip. This will just lead to premature oxidation, and may damage some of the smaller standard style tips”
Here’s a link to their website: https://www.carvertools.com/
Then click on “Customer Support & FAQ”
Nibsburner
I couldn’t find the manufacturer site. One retailer said that the manufacturer wasn’t making them anymore.
Peter Child
Doesn’t say anything about conditioning or preparing the tips for first time use.
Here’s a link to their website: http://www.peterchild.co.uk/pyroinfo/pyinfo.htm
Razertip
Question: “Is there anything special I have to do to my tips before I use them? Should I anneal them?”
Answers: “There is nothing to do other than to simply plug in the pen and start using it. Besides being unnecessary, “annealing” (or softening) the tip would not be possible when using the pen on a Razertip power supply as the tip will hold its temper (or hardness) right up to 1700ºF. Heating the tip beyond 1700ºF would actually weaken the tip and shorten its useful life.”
Here’s a link to a pdf file on their website that covers use and maintenance: https://www.razertip.com/pdf/SSD_120V_English.pdf
I know there are many other brands of burners out there, but I think I covered most (if not all) of the major brands that offer ‘professional’ burners. The important thing about my research is that I couldn’t find anything one manufacturer stating you need to prepare brand new pen tips for use.
Simply put, pen tips come ready to use.
ABOUT MY PEN TIP
 The pen tip I’m using for this demonstration is Colwood’s SQ shader. I don’t like it, so I don’t care if it breaks. I use it for when burning really dark backgrounds, and other high heat applications.
Here’s a link to the pen tip on Colwood’s website: Colwood SQ shader
 What I didn’t like about the pen tip was that it had a chiseled tip. I sanded the tip off, but I didn’t take a photo of the tip before I sanded it. This photo shows the pen tip after I was done altering it.
 This illustration presents how the pen tip looked before I sanded the chisel part off of it. When I use the razor edge of a tip, I expect it to produce a thin line. The chisel edges prevented that. I had to hold the pen at a 90-degree angle, completely vertical, to access the razer edge. Even after I modified the tip, I still don’t care for it because of how thick it is. For some the thickness makes it difficult for me to get thin lines. Now it’s my dedicated super dark background tip.
WHY CLEAN
Why is it important to clean your pen tips? There are several reasons, so let’s cover them.
1) Clean tips will glide over the wood surfaces better than dirty ones.
2) Heavy carbon build (dirty pen tips) up can interfere with the heat output. The carbon acts as an insulator. The thicker the buildup is the less heat gets through. When this happens the burn result gets lighter in color.
3) Heavy carbon buildup makes it harder to get smooth burn results because the buildup can catch on any irregularities in the wood.
CLEANING WHILE BURNING
 There are times when I’m working on a dark background and I don’t want to stop burning to clean the pen tip. What I’ve found works well is using clean cotton fabric like denim.
Be aware that you can also use almost any natural fiber cloth including linen (flax).
Do not use any synthetic cloth or fur. Synthetic cloth are materials like nylon, polyester, rayon, spandex, etc. The reason to avoid them is because are made with polymers (plastics) that will melt under the heat of the pen tip.
 I like to use a piece of denim cloth that I place on a heat safe surface.
 I’m burning hot enough to generate visible smoke. My burning is set just high enough to accomplish a very dark burn if I press the pen tip to the wood and pause ever so slightly. The heat is not set so high that the pen tip glows red. I personally think that the heat is set too high if that happens.
 After burning a row or two on the board, there is some carbon build up on the pen tip.
 Rub the tip quickly and gently over the denim material. Do not pause while rubbing as you can char the fabric. Also, you do NOT need to exert any pressure on the pen tip.
 Using fabric will remove most of the carbon, and you can resume burning.
How much carbon it removes depends on how much has built up. The fabric removed 99% of a thin layer of carbon, but it couldn’t remove a really thick layer of carbon. If the fabric doesn’t remove all of the carbon, then the pen tip will a deep cleaning using a polishing compound once the burn session is over.
I do recommend wiping the tip on the fabric on a very regular basis to help prevent a thick layer of carbon from forming. Depending on how hot you’re burning, even that might not prevent the carbon from building up. The only thing I can recommend is to try it.
 Let me reiterate that need to place the fabric on a heat safe surface! Fabric is not very thick, so the heat can easily penetrate to the underlying surface and damage it.
I used a scratchboard and you can see that it removed some of the ink from the board. Scratchboards are hard boards coated with black ink. To use you scratch off the design you want.
This style of art wasn’t my thing, so instead of throwing it away, I now use it to secure watercolor paper and act as a heat safe surface.
POLISHING COMPOUNDS
 To deep clean a pen tip, you need a strop and a polishing/buffing compound.
 Strops are traditionally made out of leather, and often the leather is glued onto a piece of wood.
 From what I’ve read, a strop can be made out of almost anything including cotton fabric, paper, and even cardboard.
 A very common polishing compound is aluminum oxide.
 I’ve only seen this compound available in a powdered form. That doesn’t mean there is another form of the substance available, it just means that in my very brief searches I’ve only found the powdered version.
Regardless, I haven’t tried aluminum oxide.
 What I use is a polishing compound made by Sharpal.
This particular brand of polishing/buffing compound is made out of chromium oxide.
 The box contains two bars that feel like very firm clay or hard wax.
TO USE:
 Apply a little of the compound to the strop.
 Then gently rub the pen tip over the compound coated strop until the tip is clean.
Make sure the pen tip is cold or cool to the touch. You do not use polishing compounds while the pen tips are hot.
If you are using the powdered aluminum oxide, just is sprinkled a little bit on a strop and then the pen tip is gently rubbed over the powder. Another method is to dip the pen tip into the jar, and then gently rub the pen tip the strop until it is clean.
Amazon Product Links:
Be aware I provide links to the first product I find. This may or may not be the cheapest one available.
 Aluminum Oxide

 Sharpal
Make sure to pay attention to the manufacturer’s description of the polishing compound. Don’t assume that the color corresponds to a particular grit! You want a compound that is fine grit.
 Here’s a link to this product on Amazon: Strop w/Compound

 Richy Coelho has a video on how to make your own strop. Here’s a link to that video: https://www.youtube.com/watch?v=KFDr5RTKOZc
LEATHER vs DENIM FABRIC
I’m going to test out cleaning capabilities of leather and denim fabric. With the leather I will test out the grain and flesh side to see if there’s a difference there. I just want to see if what the strop is made out of has an impact on the compounds ability to clean.
 Denim Cloth
I will start out with the denim cloth. The cloth is clean, made out of 100% cotton, and is placed on a heat safe surface.
 This photo is showing that I’m starting out with a clean pen tip.
 I burn a few rows of really dark blotches on my board. The heat is high enough that visible smoke is being generated, but not so high that the pen tip glows red. I’m not a fan of having the heat high enough to make the metal glow red.
 This coats the pen tip with a layer of carbon.
 I first wipe the tip on denim with the heat still on to remove as much of the carbon as I can.
 Because it was such a thick layer of carbon, the denim didn’t remove all of it. This photo shows the carbon residue that is still on the tip
TURN WOOD BURNER UNIT OFF! Do not use a hot pen tip when using the polishing compound! You should be able to touch the pen tip with your finger and not feel any warmth.
 While the pen tip is cooling down, apply a small amount of compound to the strop; which in this case is denim.
Do not use the same piece of denim that the pen tip was wiped on when burning. The carbon would mix with the compound and I doubt it would be as effective at cleaning.
 Then gently rub the cold pen tip over the strop. Do not press hard. Check periodically to see if the carbon is gone.
 Here’s how the tip looked once I was done. Nice and clean.
 Leather – grain side

 Like the previous two tests, I start out with a clean pen tip.
 Then I burn some more rows of dark blotches on my artwork.
 Just like before, the high heat style of burning coats the pen tip with carbon.
 I wipe the pen tip on the denim cloth while it is still hot to remove as much carbon as possible.
After that I turn off the heat, and let the pen tip cool down. While the pen tip is cooling I rub the polishing compound onto the leather.
 After the tip is cool to the touch, then gently rub it over the leather that has a bit of the compound on it. You can see how the compound gets a grayish hue as the carbon is removed from the pen tip.
 Just like the denim strop, the grain side leather strop cleans and shines the pen tip.
 Leather – flesh side

 I start out with a clean pen tip.
 Rows of really dark blotches on are burned onto my art project.
 This coats the pen tip with a layer of carbon, so I wipe the tip on denim with the heat still on to remove as much of the carbon as I can.
To remove the stubborn carbon, I turn off the heat, and let the pen tip cool down. With this style of pen tip, that doesn’t take long. Afterwards, gently rub the cold pen tip over the polishing compound that is applied to the strop.
 Here’s how the tip looked once I was done. There is still some carbon residue, so I ended up applying a fresh patch of compound and rubbing the tip over that.
The second treatment removed all of the residue. I didn’t bother with photographs as I think I’ve probably included too many as it is.
The Winner
All three produced very similar results, and removed all traces of carbon.
1) Grain side (top) of the leather is my top pick. It seemed to work quicker.
2) The denim was a close second.
3) Flesh side (bottom) of the leather third. It seemed to me, that the flesh side took the longest to clean up the pen tip.
Keep in mind that the results are subjective. I didn’t make sure that I burned the exact same number of blotches, or that I the carbon build up was the same after each burn session, etc.
BENEFITS OF CHROMIUM OXIDE
I started using the chromium oxide polishing compound at the beginning of 2022, and I’ve noticed a couple of beneficial effects of the compound.
1) Pen tips cleaned with the compound glide across the surface of the wood easier. if I’m using a pen tip that hasn’t been cleaned with the compound yet, I can really tell a difference.
2) I’ve discovered that pen tips cleaned with polishing compound resist carbon build up better. The lower heat setting is the longer this phenomenon lasts.
3) After the initial cleaning the pen tips are easier to clean.
Since I haven’t used aluminum oxide, I don’t know if it provides the same benefits as chromium oxide. I would guess that it does, but I can’t swear to it.
Manufacturer’s Cleaning Recommendations
These are listed in alphabetical order. I’m not providing links to their websites as I already provided them near the top of this blog.
Brennpeter
BrennPeter’s main website provides zero information about cleaning and/or caring for pen tips, but they have a separate site that they sell their products on.
 When I searched around that sight if found wire brushes to “remove char” from the tips. Since they sell the brushes, I have to assume that is their recommended cleaning method.
https://www.bastelfritze.de/en/Pyrography—Brennpeter/
Burnmaster
I couldn’t find anything on their website about cleaning pen tips.
Colwood
I found a pdf article on Colwood’s classroom section on their website that states, “To clean tips, use factory recommended methods, and stay away from coarse emery cloth or sandpaper, unless you wish to buy new tips – often!”
Interestingly, Colwood sells honing paper, and cleaning burrs on their website all designed to clean pen tips. The honing paper, which I haven’t tried, comes with a warning about how it can wear away the metal on the pen tips. From personal experience I know the cleaning burrs will also remove metal from your tips. Ironically, they sell products that are the type of items their instructions say to avoid.
Nibsburner
I couldn’t find the manufacturer site.
Optima
“To knock off carbon from time to time, lightly buff the tips occasionally with a leather strop or small cloth buffing wheel (fits on a Dremel wheel mandrel), with a small amount of polishing rouge or buffing compound.”
 I do want to mention that I did try using a cloth buffing wheel, but it didn’t work well for me. About the only thing it did was fling little strings from the cloth around my studio. Here’s a link to a package of them on Amazon if you want to try them: Cloth Buffing Wheels
Peter Child
I couldn’t find anything on their website about cleaning and / or caring for pen tips.
Razertip
 “Carbon Build-up. Carbon build-up on tips can be quickly and effectively removed with one or two passes over a Razertip tip cleaner/scraper. This economical cleaner won’t wear out your tip, and you can leave your burner on when using it. One hand operation means you don’t have to put your work down, either.
You should never use abrasives (sandpaper, emery, rouge) to clean your tip – they will wear it out prematurely, and will actually cause quicker carbon build-up.”
 I didn’t know Razertip had such a device available until I wrote this blog. I purchased one, and I wouldn’t recommend it! I tried it out and it scratched up my pen tip! I was rather surprised and extremely disappointed with this gadget. I was also upset, but not near as upset as I would have been if this had been a shader I liked!
SAFETY PRECAUTIONS
 Now let’s talk safety. When you first use a pen tip after it’s been cleaned with chromium oxide, any residual compound on the tip is burned off and smoke is produced. Don’t inhale the smoke!
Hold the pen tip well away from your face for a second or two until the tip is done smoking. It doesn’t take long even on a low heat setting.
I don’t know if aluminum oxide does the same thing, but if it does take the same precaution.
 I looked up the MSDS (material safety data sheet) for both oxides. Chromium oxide appears pretty benign, but aluminum oxide has a warning that the substance and be an irritant and/or toxic if inhaled. That said, use common sense and keep your exposure to a minimum if you use either substance.
Common sense covers things like: Don’t inhale the oxides.
Don’t eat the oxides. They are probably tasty, but resist the urge! Yes, this is a joke and my lame attempt at humor.
Wash your hands after using the oxides.
Using the oxides in well ventilated areas.
Wear a mask when using the oxides.
Here’s a link to the chromium oxide MSDS: Chromium Oxide MSDS
Here’s a link to the aluminum oxide MSDS: http://dept.harpercollege.edu/chemistry/sds/Aluminum%20Oxide.pdf
BE COMFORTABLE
Keep in mind I’m not a chemist or a medical professional, so don’t take my word as gospel. Do your research and decide what you are comfortable using.
You may decide you’d prefer to avoid any chemical cleaner and stick with more benign things like fabric.
CARE TIPS
1) Something that almost all of the manufactures agree on, is the recommendation of using just enough heat to get the job done.
 Most of the time I have the heat set between 2-4; my burner goes up to 10. My goal is to get a dark tan burn result. Keep in mind that the exact setting depends on the pen tip, the type of wood I’m burning on, and how many hours of burn time the pen tip has. A new burn tip will need a higher heat than one that’s been used a lot.
2) If the handset feels hot and becomes uncomfortable to hold, then turn off the machine and let it cool down. Prolonged excessive heat can cause the machine, handset, and/or pen tips to wear out faster.
3) Do not turn up the heat on your burner and burn off the carbon from your pen tip. Instead clean it the proper way.
4) Store your pen tips in such a way to protect the tips from damage.
 The easiest, and probably the cheapest, is to use the container the pen tip ships in. Colwood ships theirs in a hard plastic tube.
 Another option is to build your own. For example, this photo shows a desktop pen tip holder. I like the desktop holder because it make it allows me to organize my pen tips and keep them close by.
This hold was designed for the replaceable Colwood pen tips. Here’s a link to the blog: https://wp.me/p8j0lZ-4pG
 Here’s a photo of the portable pen tip holders. Both are super easy to do and inexpensive. Here’s a link to the blog: https://wp.me/p8j0lZ-6xM
PRODUCTS I DON’T RECOMMEND USING
 Use coarse or low grit sandpaper. The sand paper will damage the metal on your pen tips.
 Emery boards or nail files are included in the category of coarse sandpaper.
I’ve had a couple of metal workers tell me that if you use sandpaper to clean or polish metal with, it needs to be at least 10,000 grit. Keep in mind that I’m just passing on information that was given to me. I haven’t tried it.
 Don’t use Colwood’s honing paper. I haven’t tried it, and there is nothing about it that makes me want to try it.
Colwood claims their honing paper will, “Clean the tips or your pen when carbon buildup occurs. This buildup will reduce the temperature of the tip and make it necessary to increase the temperature setting on your unit. You may clean your burning tip by gently rubbing it with Colwood’s honing paper.”
 The honing paper is 600 grit sand paper, and it comes with a warning about how it can wear away the metal.
Here’s a link to it: Colwood’s Honing Paper
 Colwood Cleaning Cloth or Polishing cloth is nothing more than 800 grit emery cloth. Colwood claims that you can use it to clean tips “without creating undue wear or removing of any metal.”
That statement is partially true. Yes, the cloth does not cause undue or excessive wear when used once or twice, but over time the repeated use of it does remove metal. I know this from personal experience.
I used Colwood’s emery cloth exclusively for several years, and eventually I noticed that my favorite shader was getting a thinner. I don’t use this product anymore.
Here’s a link to the product: Colwood’s Cleaning Cloth
 Colwood sells a set of 5 cleaning burrs. The burrs will remove even the heaviest of carbon build up very quickly, but there’s a price for this convenience. The burrs also remove metal and this thins out the pen tip. It only takes a couple of uses for the thinning to be noticeable!
This is another product I don’t recommend, but if you’re interested in them here’s a link: Colwood’s Cleaning Burrs
 The burrs are designed to be used with a Dremel, but they can be used without; it just takes longer.
 When I started using the burrs, I wasn’t aware of any damage they might do. After all, Colwood claims that the burrs easily remove carbon “resulting in a longer tip life and more hours of comfortable burning!”
I used the burrs approximately once a week for a month, and I noticed considerable wearing down on my favorite shader. I quit using them, and I don’t recommend using them unless you’re okay with the idea of replacing pen tips on a regular basis.
IN CONCLUSION
I hope I answered any questions you may have had on this subject. It would be nice if all manufacturers and pyrographers presented the same (and hopefully accurate) information, but I’d be surprised if that ever happens. In the meantime, I hope this blog was able to provide the information you need to make an informed decision on how to clean your pen tips.
Until the next blog,
Brenda
May 17, 2022
Want to subscribe?
- Click on the “Leave a Comment” field at the end of any post (blog) and a subscribe option will appear.
- Put something in the comment field (if you put “test” or “just subscribing” I won’t make your comment public)
- Fill in the sections for your email address and name, and then click on the “notify me of new posts via email.”
- You will get a confirmation email from WordPress confirming you want to subscribe.
- Click on the confirm button in that email and you’re done.
Please note that I do not send out emails. If you have a WordPress account there is a way to subscribe within the WordPress system, but I cannot provide specifics on how it works as I don’t know.
merci, beaucoup d’informations utiles, dont le grattoire Razertip que je voulais avoir mais qui me semblais risqué, contente de savoir qu’un bloc de bois recouvert d’une couche de cuire ou de denim avec du composé de polissage était l’idéal. J’aime vos article claire et sans prétention ou d’arrogance.au plaisir de vous relire et de vous voire travailler. Diane
Salut Diane,
Je suis heureux que vous ayez trouvé les informations utiles. Merci beaucoup pour le gentil commentaire.
Hello Branda
My name is Daniel, I’m from Quebec. I started pyrography a few months ago. Recently I discovered your site. Your explanations are so simple, easy to follow, your techniques are awesome. At first I used a small pen, then as I liked it, I bought myself a beginner’s pyrographer. And in one of your posts you said that at the beginning it would be better to buy a not too expensive pyrographer to know if you liked it, if so then you can look for something more efficient. That’s what I did, I bought the Colwood pro two like you. I should receive it soon. I often read and reread your techniques and I try to do them with a lead pencil to fully understand the principle. Thank you for your very valuable advice. Finally, I have early onset degenerative cognitive disease and it’s very difficult for me to follow the information, but with you it’s so simple and very easy to follow that’s why I love following you. .
Thank you very much Branda!
Hi Daniel,
first off let me welcome you to the exciting artform called pyrography! I hope that you will love it as much as I do.
Thank you for the kind comment. I’m glad my tutorial style is helpful and easy to follow along. Kudos to you for testing out with a pencil first. I often experiment with ideas using a pencils. It’s so much faster and easier to erase. 🙂
I’m sad to read about your degenerative cognitive disease! My most sincerest wish is that it will progress extremely slow.
Thank you again for the comment. Take care
B