In this blog I’m going to talk about the different products I use in Pyrography. I put the products in alphabetical order other than the burner and pen tips. Keep in mind that some of the items I list I don’t use that often, but I wanted to have one location for you to find any of the products I’ve used. One thing I’ve done with this blog is to try and explain why or when I would use certain products. Plus, if I have any blogs that go into greater detail about the item, I’ve included a link to that blog.
Be aware that while I’m supplying you this list and links to many of the products, I am not affiliated with any of the products or manufacturers of said products.
Almost all of the links are for Amazon. With some items, like art supplies, I have provided multiple links because I find they are generally cheaper on Jerry’s Artarama versus Amazon. I did not compare prices between the two to see which one was cheaper, so I recommend you do so.
Full Disclosure: If you purchase anything using the Amazon links provided, I do receive a small commission on the sell at no extra cost to you. Please do not take this as a plea for you to purchase anything. I just wanted to be completely transparent about the Amazon links.
BURNER
 I’ve mentioned numerous times that I use a Colwood burner. I cannot tell you if it is the best burner available. Instead, I can tell you that I’ve used the heck out of mine and haven’t had any problems with it. I did write a blog about the Colwood burner I use: Colwood Super Pro II review
Here’s a link to Colwood’s website: COLWOOD
Amazon link: https://amzn.to/3ubKhD5
Mountain Woodcarvers is another site that sells several brands of burners. Plus they occasionally have sales. I have not bought from them, so I can’t tell you how good or bad they are to work with. Here’s the link to Mountain woodcarvers site: MOUNTAIN WOODCARVERS

I recently (Aug 2022) tried out this burner by Goodcrafter. It performed extremely well on my tests and I was able to create some fantastic artwork with it. This burner is significantly cheaper than the Colwood. Plus, it comes with a LOT more stuff. Here’s a link to the review I did on this burner: Goodcrafter Burner Review
Here’s an affiliate link to the product on Amazon: https://amzn.to/3A9FCUf
 This burner will work with other brands of wire pen tips. Here’s a set I found that has ball tips: https://amzn.to/3E1fY7K
 I bought a set of alphabet brass tips to try out, and they worked with the machine. Here’s a link to the alphabet tips: https://amzn.to/3y5ZWFP
BURNER PEN TIPS
This section only covers Colwood pen tips as they have to be bought separate from the machine. I buy the pen tips directly from Colwood. Keep in mind that other places do sell them and they might be cheaper and/or go on sale. I’ve already put a link to another seller besides Colwood, and that is as much as I’m going to do.
There are options with the Colwood pen tips; fixed or replaceable tips, polishing, and bending.
 Fixed tip or replaceable? The fixed tip (FT) is permanently mounted to the handset. It lacks the lip a replaceable tip (RT) as to pull the tip from the handset. I’ve used both and I couldn’t tell a difference between the two. Note that all of the links I provide are for replaceable tips.
Please keep in mind that I didn’t use the fixed tip very long; just a couple of minutes.
I use the replaceable tip system because it’s what I was given (Todd bought the burner).
 The replaceable tips are easier for me to store. Todd made me this wooden tip holder that sits nearby when I’m burning. Here’s a blog with directions on how to make one. Build a pen tip holder
 Polished pen tips? The left (1) pen tip in the image is unpolished and the right (2) is polished. The photo is bad, but pen tips aren’t the easiest for me to photograph.
Other than being shinier, polished tips are easier to clean and glide over surfaces a bit easier. Are they worth the extra fee? Probably not unless you plan to burn on leather. Then I highly recommend it.
 Bending pen tips? I personally like my shaders bent to a 45-degree angle. Shaders are the only pen tips I like bent. I should mention that I bend my own pen tips and it’s not something I recommend. For one thing it voids your warranty, and I bent my tips before I knew better. Plus, the place where I bent the tip is a very fragile area, so the risk of breaking the tip increases.
 This composite photo shows a J shader. The far left is how the shader looks without any alterations. The middle image shows the shader after I bent it. The far right image is the bent shader from Colwood.
Again, the location where I bent the shader (middle pen tip) is a fragile area, and you can easily break the tip of the pen off. I do not recommend doing what I did.
Which pen tips to buy?
Please keep in mind that we are all different, so I’m telling you information based on my preferences. That doesn’t necessarily it is the right thing for you. For example, both Valarie of Drawing with Fire and Richy Coelho like using spoon shaders. They do fantastic work with the spoon shader. I bought one to try it out and absolutely hated it. I just couldn’t be sure where exactly I was burning, and I didn’t like that lack of control. That is one of the reasons I very seldom use ball pen tips. Several artists have told me that ball pen tips are awesome because they glide over the wood very easily and you can create all sorts of textures with them. The fact that they have found a pen tip that works for them is wonderful because at the end of the day that is the only thing that is important; finding what works for you.
 I honestly think all you really need are two pen tips: shader and a writer. I have a video that covers this subject, to watch just click on the image to the left. In the video I pick Colwood’s D shader and the C writer.
 D shader is an extremely versatile tip because it has 4 burning edges. The left straight side produces a medium width burn. The upper left corner produces a bit thinner or smaller width burn result than the left side. The tip provides the smallest results, and the right edge produces the largest or widest burn results. Here’s a link: Replaceable D tip
Note that Colwood identifies their pen tips with letters, and the letters have nothing to do with the shape or function of the pen tip.
 C writer is a great writer. The pen tip can be turned on edge (inset photo) to get really thin lines, or you can use the wider side to get thicker lines. The pen tip is large enough to fill in small areas quickly, and it doesn’t sink into the wood like the micro writer does. Link: Replaceable C tip
Additional pen tips. Before I get into that, I want to mention that I like to do small detail work. I do mean small details. This is not something that appeals to everyone, so keep that in mind. If you don’t like working really small, then wouldn’t bother with the pen tips in the small category.
WORKING SMALL
 Micro C writer. This pen tip only produces thin lines. I often use this to burn in trace lines and stippling (dots). The image shows two pen tips. The left pen tip is the current model that Colwood sells. The right pen tip is the old version. I show this because I still use it and you’ll occasionally see it in my videos. They are the same pen tip. The only difference is the new model is much sturdier than the old.
In fact I accidently bent the old model when I exerted too much pressure on it when I was first learning pyrography. I was using it to create divots or shallow holes in the wood. Now I use a completely different tool for that! Replaceable micro c tip
 J and mini J shaders. I find that I use the J shader a lot, but again that’s because I like to work on small detail stuff. It was a pen tip that I automatically gravitated to. I’m sure that you will find there are certain pen tips you will like and use more often. The mini j shader is the smallest shader Colwood currently makes.
WORKING LARGE
 E shader. The E shader is one of the largest shaders Colwood makes. It comes to a point, so can be used for detail stuff. This tip is so large, so I use the heavy duty side of my burner. The reason is that I don’t have to turn the heat up as high. On the detail side, the heat gets a bit uncomfortable if burning for any length of time. Replaceable E tip
 LSS shader. This stands for large square shader, but since the corners are rounded I don’t really consider it to be square. In theory you can burn a very wide stroke with this, but I find I have difficulty holding the pen tip properly to get a wide burn stroke. Maybe that’s because I’m left-handed. I don’t know.
What I have found this pen tip to be useful for is creating fur texture when I want a thicker fur. Or fur that doesn’t look like lots of fine lines or thin hairs. Replaceable LSS tip
*Updated June 15, 2021 – I have found that this pen tip is rather helpful for doing longer fur on animals. I used it to help with the thick fur around the neck of the Mexican grey wolf, and I’ve been using it on the mane of a lion I’m working. I’m really starting to like this pen tip.
EXTRA TIPS
 Large ball pen tip (#3). This image shows all of the ball pen tips Colwood currently makes. They even offer the set at a cheaper price than buying all three separately. I have found that I personally only use the large ball pen tip (#3) on the far left. The C writer can produce dots of similar size as the medium (#2 – middle), and the micro writer can produce dots the size as the small (#1 – far right).
As I said before there are artist who swear that the ball tips are essentials and highly functional for their burning style.
I don’t use ball tips that often. I use them in mandala art and for adding texture to animal tongues and noses. That’s about it. Replaceable large ball tip
 MR rounded heel. This tip is excellent for burning thin straight lines. I use this when creating dark borders around the edges of my art. I use it when burning buildings that have straight lines. Because the edge is very thin it does have a tendency to sink down into the wood. Replaceable MR tip
I do have a blog that explains how i create straight lines for my borders. Borders & Straight Lines
 S Shader. This is a medium sized shader. I like it because it has a slight curve at the end, so it is less likely to catch on the wood when I’m pushing the pen tip away from me. Replaceable S tip
If you want more information about the pen tips I use including samples of burn width capabilities, then here’s a blog to read: Colwood Pen TIps
ARTIST GLOVE
 I only use this when I’m burning on paper. I should add a stipulation to that. I use it when I’m working on a project I plan to keep. I’ve don’t several portraits for tutorial purposes. I don’t know the people in the photo and didn’t keep the artwork, so I wasn’t concerned about keeping the acid-free properties of the paper intact.
To keep paper archival (acid-free), you need to avoid touching it. Since I rest my hand on the paper when burning, I wear the glove to protect the paper. It can easily be used by left or right-handed artist.
Amazon Link: https://amzn.to/3AeXDly
BLENDING STUMPS
 I use either blending stumps or torillions to smooth or blend colored pencils. I don’t use colored pencil a lot in pyrography, but I found that blending it helps push the color down into any micro groves the wood might have. You can use a Qtip or cotton tip, or a piece of paper towel to do the blending. I use the blending stumps because I have a lot of them from my pencil drawing days.
Blending stumps are made out of paper that’s been tightly packed or rolled, so the stump is solid. They hold their point fairly well. To clean and reshape, just rub the stump on clean sandpaper.
Tortillions are made out of rolled paper, but the center is hollow. Tortillions tend to lose their point rather quickly because the paper caves in on the tip. If it loses its point, I use a thin long stick (like bamboo sticks for shish kabobs) to poke it back out.
Jerry’s Artarama blending stumps
BOOKS

The Art of Pyrography by Cherry Ferris contains a lot of interesting ways to incorporate other mediums into your artwork. Clicking on the image will open the blog I wrote reviewing the book. The blog has a link to the video version of the review.
Amazon link: https://amzn.to/3XdDSUQ

This book by Aney Carver of Pyrocrafter’s is an excellent resource for beginners. What makes it so great is that the projects are simple. They are designed to give the fledgling pyrography artist experience and build confidence.
There are two things I really like about the book:
1) Aney uses a craft burner, so you don’t need a fancy burner to do her projects! Craft burners are those with solid metal tips.
2) Aney introduces you to a wide range of mediums to burn on. Not only do you gain much needed experience, but you also get exposed to an assortment of items to burn on.
I haven’t done a book review yet, but it’s on my to-do list.
Amazon link: https://amzn.to/3YKNsi9

Simon Easton’s Yearn To Burn is an excellent resource for anyone wanting to sell their artwork. Simon has a number of fairly easy to do craft projects that could be sold at fair and online. Click on the image to read the blog. The blog has the link for the corresponding video review.
Amazon link: https://amzn.to/417uiol
The below books are ones that I use for reference photos. They are filled with line drawings.
 I’ve used images from Jim Harter’s book of plant illustrations on a couple of projects. I find it helpful for coming up with background ideas. Plus the illustrations are in black and white, and were created using pen and ink. This type of image translates very well into pyrography.
Amazon Link: https://amzn.to/3nry8G3
 I also like Jim’s book of nautical images. With both books I tend to modify the images a bit, but you don’t really need to. I haven’t used this book much, but I have plans to. Amazon Link: https://amzn.to/3bxWVWh
CAMERA
 I use a Nikon D3400 camera that has a lovely metallic red body. Red is my favorite color. 🙂 I bought my camera quite sometime ago and it was part of a kit that I got for around $400 USD. Now the camera with one basic lens goes for that price!
I’m not what I would consider a photographer. I have all of the settings on automatic, so it’s basically an expensive point and shoot. The link I provide is a kit that has the camera bag, 2 different lenses, the camera body (in black), and some accessories.
Amazon link: https://amzn.to/3OP4ZAr
CARD MAKING STUFF

I did a tutorial on making greeting card. This combines pyrography and crafting to create. It’s super easy and you can watch the tutorial by clicking on the image to the left.
In the tutorial I use a couple of items I wouldn’t normally use with pyrography, so that’s why I put them in this category.
 Paper creaser. I actually bought a set of creasers for doing leather work, but so far I haven’t used them until I made the greeting card. These are listed as ‘bone folders,’ but they are made out of plastic.
Amazon Link: https://amzn.to/3I4mCKr
 I also used purple embossing powder. I bought a kit that had a wide assortment many, many years ago. I found a small assortment on Amazon that has purple in it.
Amazon Link: https://amzn.to/3Af88VZ
 Embossing Marker. Embossing markers have a glue that allows the powder to adhere to the them. The brand I’m using is no longer available, but I did find a clear marker and that will work. It’s rather amazing how old a number of my craft supplies are. 🙂
I found a clear embossing marker on Amazon. Amazon Link: https://amzn.to/3NxfAyP
 Another item I use is the crafter tray. I dump excess embossing powder from the card into the tray. One had has a funnel, so I can recover the excess and return it back to the jar.
Amazon Link: https://amzn.to/3bDlSQ6
 A heat gun is needed to activate embossing powder. Mine is super old, so I’m listing the most popular one on Amazon.
Amazon Link: https://amzn.to/3bCvOtg
CLAMPS
 I permanently borrowed a couple of small rubber clamps from Todd’s shop. I use them to clamp the reference photo to my easel someplace close to the board. I’m pretty sure that Todd purchased his at Harbor Freight, but I can’t swear to that. The link is for a pack that has several sizes.
Amazon Link: https://amzn.to/3bCw4se
CLEANING
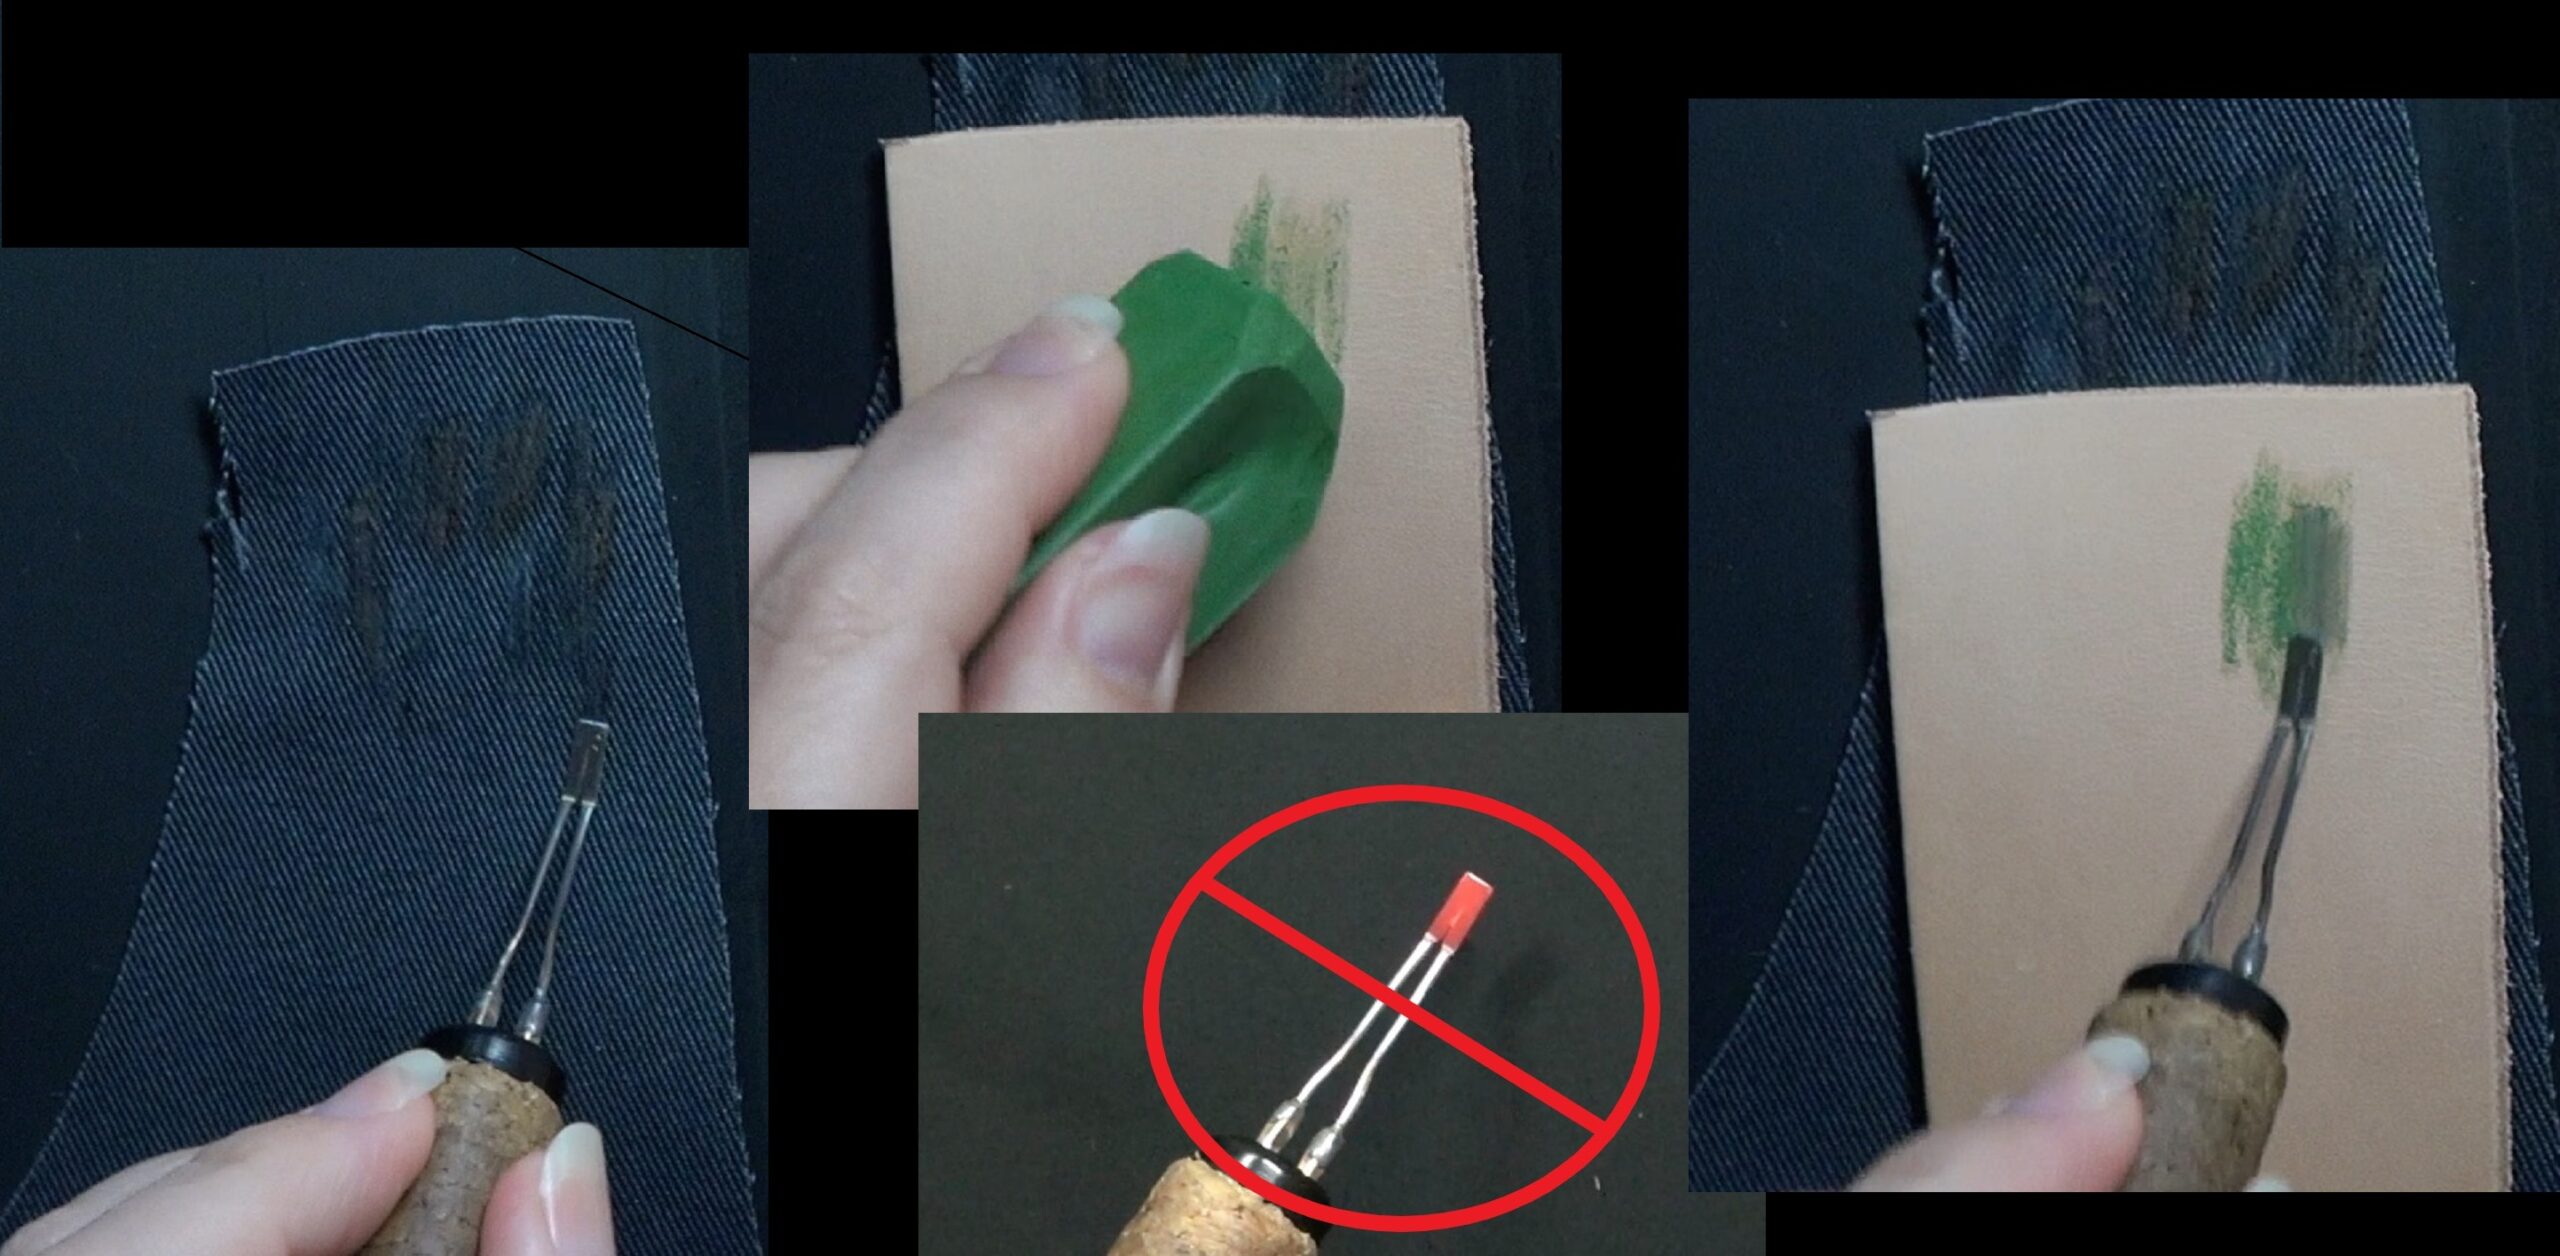
 I no longer use a cleaning cloth on my pen tips. Part of the reason is that I had several metal workers tell me the cleaning cloth is nothing more than 800 grit sand paper and it will wear down the pen tip. I know this is true. I’ve noticed that my most used pen tip is showing signs of wear. So I now use a polishing compound.
I bought this compound by Sharpal on Amazon link: https://amzn.to/39Z57Pe

The compound isn’t very expensive. There are two bars in the box, so I probably have a lifetime supply of the stuff.
 To use, just apply some compound on the back (fleshy) side of some leather and rub the pen tip over the area. If you don’t have scrap leather or own a strop, you can use denim fabric or even cardboard.
Honey Badger Knives is where I saw that you could use a piece of cardboard. Here’s a link to that article: https://www.honeybadgerknives.com/honey-badger-knives/cardboard-strop/
I am aware that some pyrographers recommend using Aluminum Oxide and a strop for cleaning pen tips. I haven’t tried it, but I did read the safety data sheet for Aluminum Oxide. It says that this stuff is toxic if the fumes or dust are inhaled. I’ve only seen this stuff sold in powdered form, and I’m not willing to risk my health.
I have a tutorial on this subject. Just click on the image to the left to read
COLORANTS
I don’t tend to add a lot of color to my work, and if I do it is almost always colored pencil because I hate using paint brushes. That said there are times when I use other products.
ACRYLIC PAINT
 First off I would NOT use acrylic paint over pyrography because it’s too opaque and would cover the burning unless diluted down to a consistency of watercolors. Instead, I like to use acrylics on the edges of my boards. I only do this if the background on the board is dark or if I burn a border around the board.
Since I’m using this just on the edges, I buy the craft paints in the bottles. The Apple Barrel brand is what the craft store near me carries, and I haven’t had any problems with it. Since I only use it on the sides of the board, Todd can use either spray or brush on wood finish to seal the board.
I’m sure that any brand your local craft and/or art store sells would be fine.
I like to use dark browns mixed with just a touch of black.
Amazon Link: https://amzn.to/3a3aAV9
 I think it gives the board a polished look and is much easier to do than trying to torch or burn the sides. I tend to use either black or a dark brown color.
AIRBRUSH
 Yes, I do have an airbrush system, and I use the Iwata brand. I also use the Iwata Com-Art paints. I did not buy an airbrush for doing pyrography. Instead I had one from my airbrushing days. My original airbrush was very similar if not identical to the one shown in the photo. The photo is a kit from Jerry’s that includes everything you need to get started in airbrushing. The only thing that you might consider missing is frisket film. It’s not an absolute necessity as many artist are able to use shields to mask off areas, and this kit comes with a basic shield.
Why I like using an airbrush? The color is super smooth looking, and its fast to apply over large areas. Since I use translucent colors, my pyrography still shows. It’s like using watercolors without having to use a paint brush. 🙂
Amazon Link: https://amzn.to/3ysQgG4
There are numerous kits on Amazon that are much cheaper than the Iwata. Most of the brands of I haven’t heard of, but I don’t keep up on the subject anymore, so it isn’t surprising. Since even the ‘cheap’ kits are over $100 USD, I’m not going to provide any links because I wouldn’t know if any of the kits are worth a darn.

The color on the crashing ocean waves was done with an airbrush. I have a written tutorial about this artwork and that tutorial has a link to the video version. Ocean Waves
COLORED PENCILS
I have three brands I use: Faber Castell, Prismacolor, and Soho. Note that I am not recommending any particular brand. I am not a colored pencil artist. I dabble with them and that’s it. I am also aware that there are many, many brands of colored pencils available. Don’t ask me about them as I don’t know.
As I said I’m not a colored pencil artist, but I will admit to you that I have a bit of a colored pencil addiction. I love the assortment of colors and that fact that they don’t require a paint brush to use. What’s really pathetic is that I very seldom use any of my colored pencils. Despite having 3 sets from different manufactures, there are some other brands that I want to get sets of.
 If you plan to colored pencils in your work, I highly recommend making sure to use colors with a high lightfast rating. Not all brands are the same, and colors within the same brand can have different ratings.
Generally speaking, if I’m adding lots of color, then it’s not something I wouldn’t sell because I don’t check the lightfast rating. Usually I’m doing a ‘craft’ project and just having fun. If it’s something I would consider selling, then I do check the lightfast rating and stay in the ‘very good’ or better range.
 Here’s a chart showing how the lightfastness of a color can impact its longevity. I had problems finding charts for the 3 brands I use. I did find a couple of websites that provided information. Both claimed that of the three brands I use, Polychromos has the best pencils with regards to lightfastness.
Here are the websites I found. Be aware that I have no idea if they are presenting good information, but considering how much information they are presenting I would hope they know what they are talking about. If you have questions about a particular brand, I would start with one of websites I’ve listed below.
Pencil Place: https://www.pencilsplace.com/
Best Colored Pencils: https://www.bestcoloredpencils.com/
 Faber-Castell Polychromos

Polychromos is a brand that several colored pencil artist love. This brand has a many pencils that are rated archival which means the color is supposed to last 100 years before fading. The pencils are not cheap, but quality products generally aren’t.
Amazon Link: https://amzn.to/3ybxOk2

Faber-Castell Goldfaber
These colored pencils are the inexpensive version of polychromos. They are not lightfast, but they have some of the same colors as the polychromos. I’m not even sure when I bought this set of colored pencils.
Amazon Link: https://amzn.to/3aaonci
 Prismacolor

Some of the pencils by Prismacolor, like the titanium white, are lightfast. Most of their colors are not rated as high. Interestingly this is the only brand that I was able to find a lightfast chart, but it was on a Dick Blick’s art supply website. I couldn’t find it on Prismacolor’s site.
Lightfast chart: https://www.dick-blick.com/pdfs/20508color.pdf
Amazon P (this is not an affiliate link)
 Soho
Soho

Soho states that their “professional” colored pencils are “light-resistant,” which means they are not truly lightfast. I wouldn’t use them for commissioned work.
Amazon Link: https://amzn.to/3OtetS6
METALLICS
 Pearl Ex

Pearl Ex is a powdered pigment, and they claim it is has an “extreme colorfastness,” but I couldn’t find a chart anywhere that lists the ratings of their colors. I like to buy variety sets that has an assortment of colors in little jars. You don’t need a lot as a little goes a long way.
Note – pearl ex is a powdered pigment, and it doesn’t have a binder in it. This means you must mix it with something that has a binder so it will adhere to the surface you’re painting it onto. The binder can be paints (including watercolor), glue, wood finishes, etc. Pearl Ex has a water based gloss varnish they sale, so I’ll put a link to that.
Amazon Link: https://amzn.to/3QVThpr
 Amazon Link: https://amzn.to/3nt3U5I
Jerry’s Artarama PearlEx Varnish
Apply the pearl ex after you seal the board with finish. Matte and Satin finishes will remove or dull down the metallic sheen of pearl ex. I won’t tell you how I discovered this, but I’m sure you can figure it out.
Note: If you are using a gloss finish, then you can apply the pearl ex before you seal the board.
 Yasutomo metallic watercolors is another brand I’ve used to add a metallic sheen to my art. Since these are watercolors, all you have to do is add a touch of water and apply. I have no idea about their lightfast rating.
Amazon Link: https://amzn.to/3ysZsu6
WATERCOLORS
 6/30/2021 I recently upgraded my watercolor paints because I planned to make a greeting card. Since Winsor & Newton is my favorite brand of paper to burn on, I decided to try their Cotman watercolor set.
 The Winsor & Newton paints are fanciest paints I’ve ever owned. I bought a set of 24 colors in half pan size. I didn’t include links to Jerry’s or Dick Blick because they didn’t carry the 24 color set. Plus their other sets where more expensive. Amazon Link: https://amzn.to/3Ah9iRa
DIAGONAL BOARD HOLDER
 Occasionally I will turn a board on the diagonal to work on it. It gives the artwork a unique look, but it tends to tip over. To fix this Todd made me a board holder out of scrape plywood.
 Todd cut a 90 degree wedge out of the center of the scrape plywood. The plywood is 3/4″ thick (1.9 cm), so it has enough of a lip to securely hold the board I’m burning on in place.
DRYWALL TAPING KNIFE
 This is handy when using a torch to burn borders on a board. It protects the center of the board from the torch. The wooden handle doesn’t conduct the heat, so it’s comfortable to use for extended periods of time. This is an item that you can find at most home improvement stores.
Amazon Link: https://amzn.to/3NBFTUt
I have a blog where I discuss using the taping knife to shield areas while using a torch along the border. Borders & Straight Edges
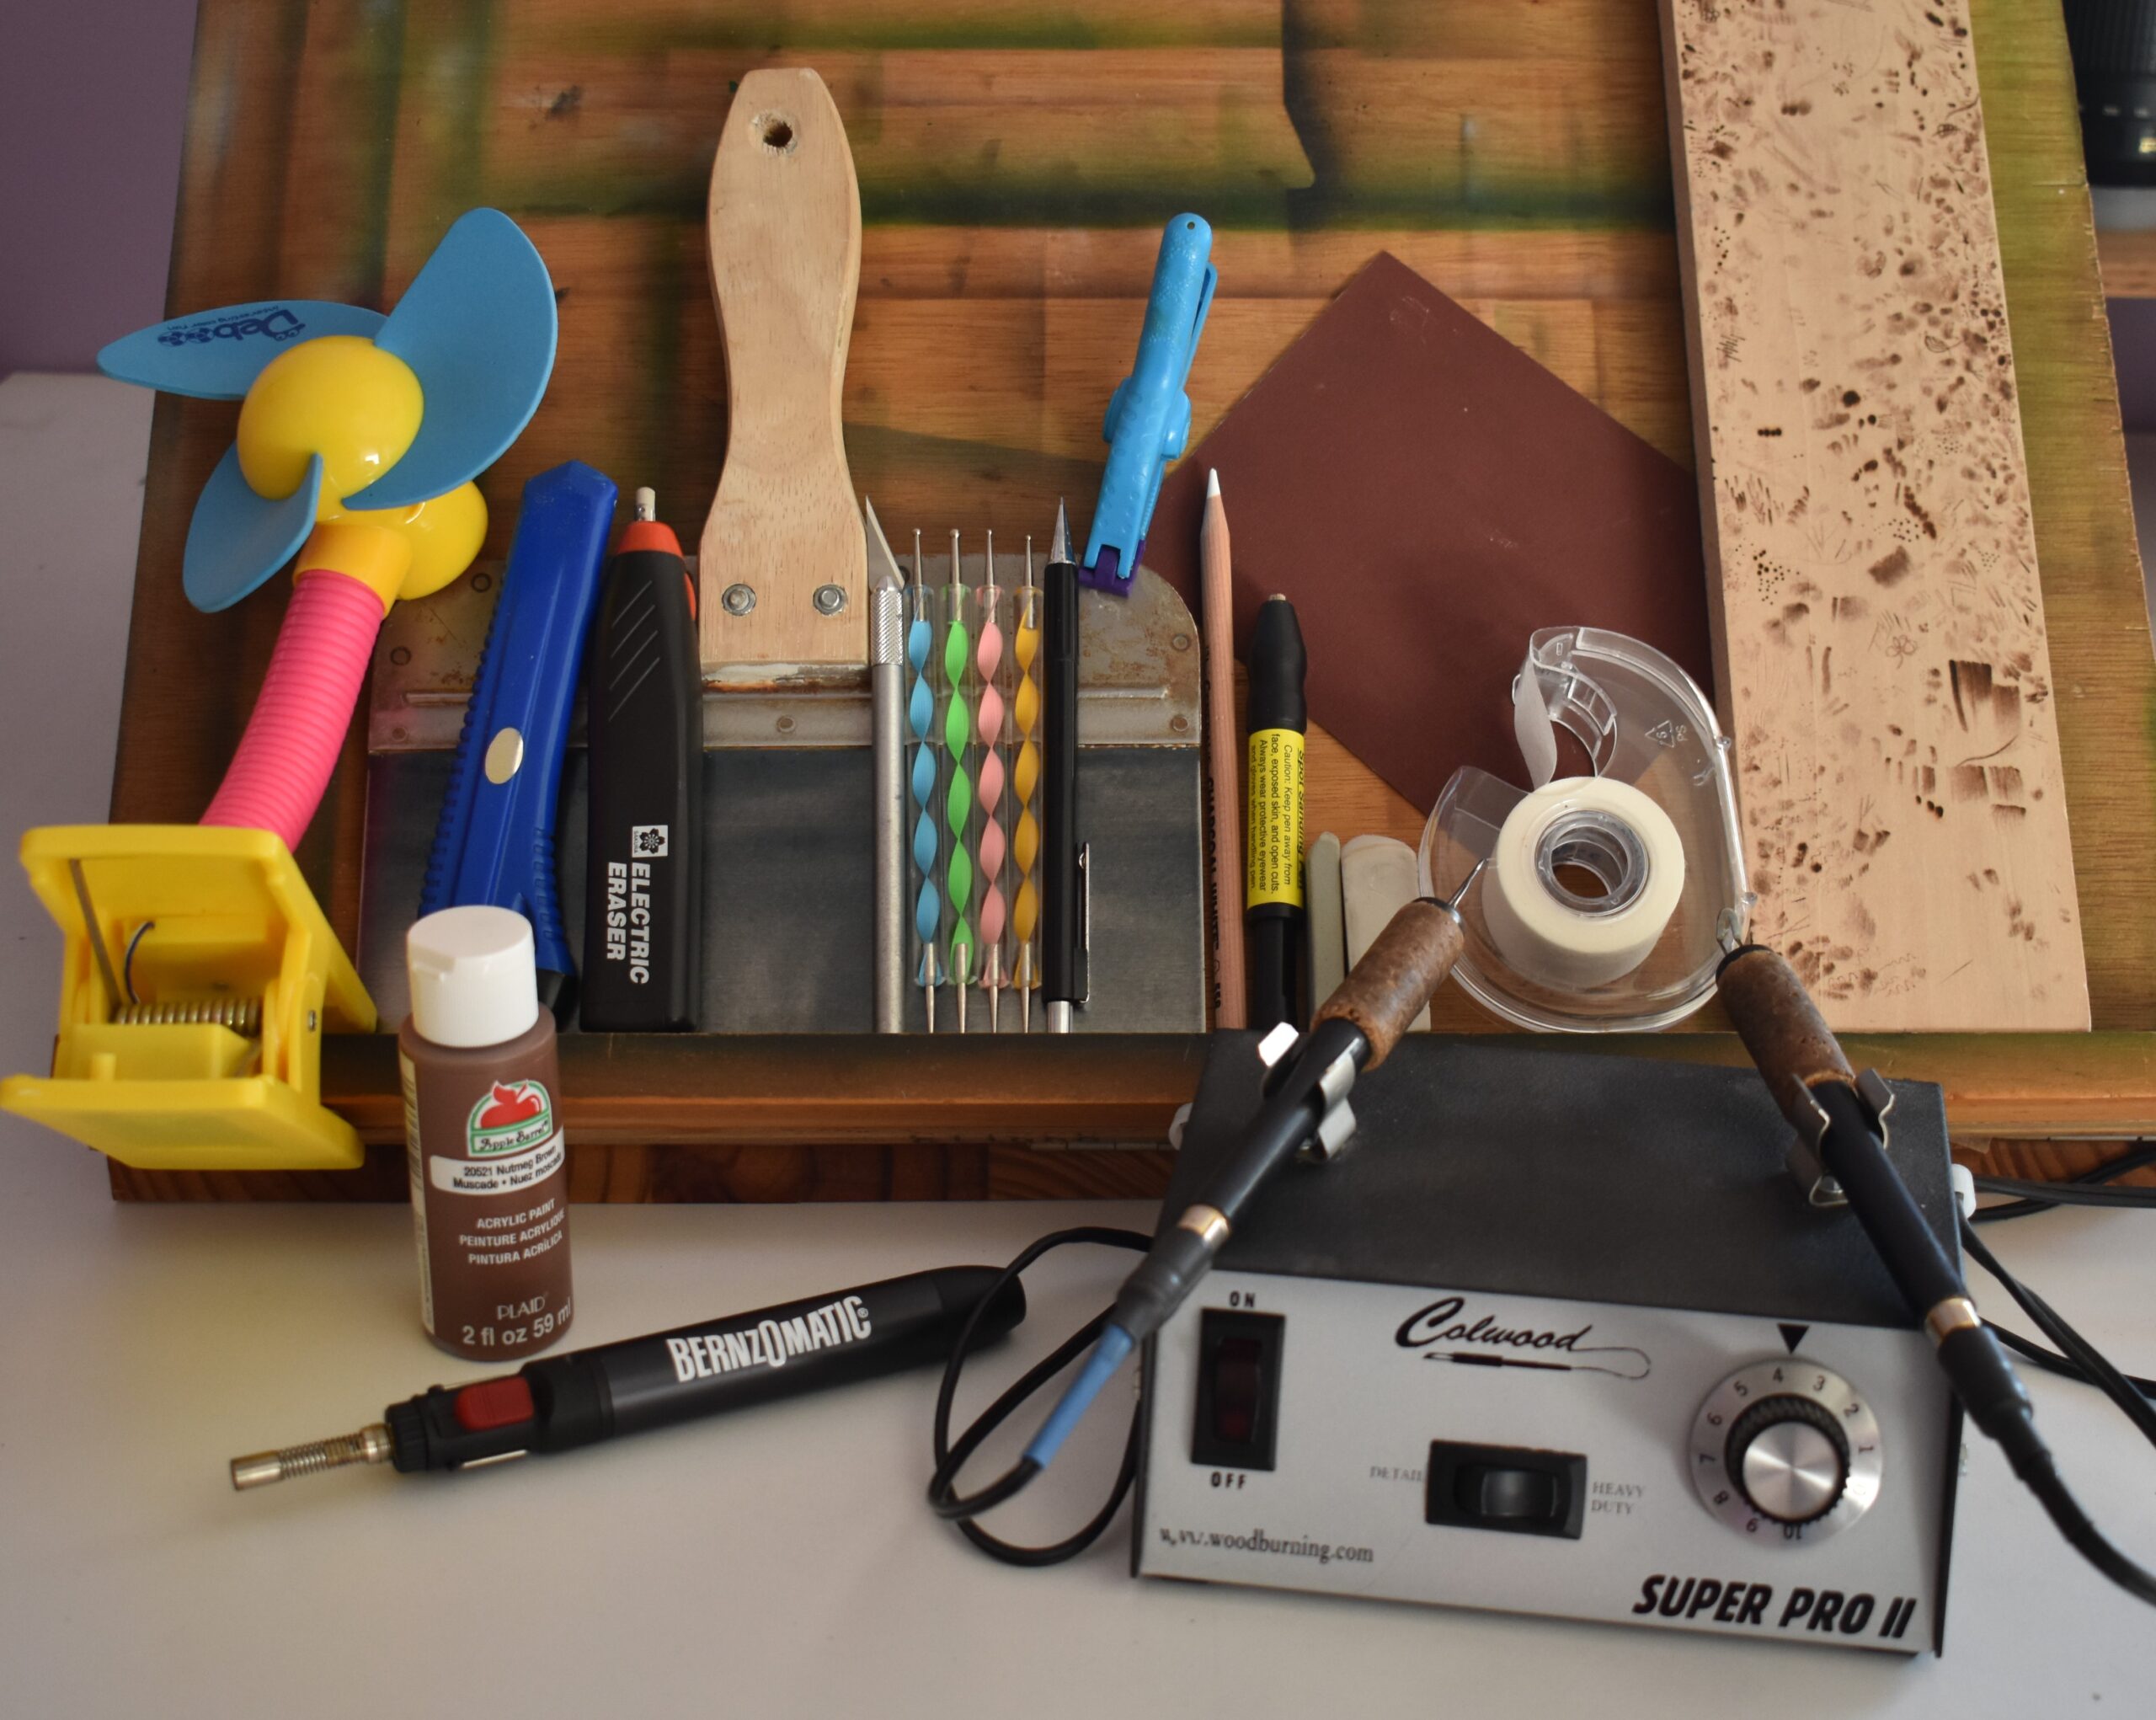
FAN
 I keep a mini foam fan near my easel. It clamps onto the easel and runs on batteries. I use this to suck the smoke up and away from the board. Never rotate the fan so that it is blowing air onto the board! The reason is that it can interfere with the heat output on your pen.
I like the foam blades because they won’t do any damage if I touch them while it’s running. Which I have accidentally done. They are marketed as stroller fans and if you do a little searching you can find them in all sorts of colors and designs.
Amazon Link: https://amzn.to/3R9sFl8
EASEL
 I always use an easel when burning. It angles the board so that it’s easier for me to see and work on. Plus it keeps most of the smoke out of my face. 90% of the time, if not more, I don’t burn dark enough to general smoke. In the upper right corner you can see a large paperclip or paper clamp attached to the board. I’ve upgraded to a plastic clamp, and it works so much better!
Todd built my easel back when I was into airbrushing. Thus the reason for the many paint lines. Unless you have scrape wood on hand, it’s cheaper to buy one.

I did write a blog about how to build this smaller easel in my studio set up blog, but again I do think it’s easier and cheaper to buy one. Build an Easel
 Here’s a link to a very inexpensive one on Amazon. I have not tried this easel! I just picked it because I liked that it had a drawer, you can adjust the angle the easel tilts at, and there’s a handle.
There are many styles out there and difference price points. Just do an internet search for Desktop Easels.
Amazon Link: https://amzn.to/3QX6T3O
EMBOSSING TOOLS
 Embossing tools are also called ball stylus tools. I use them to create divots or shallow holes and other effects. I have a video that shows some of the different ways I’ve used tools like this. Using Embossers
Amazon Link: https://amzn.to/3uAC7o3
ERASERS
I use an assortment of erasers.
 TomBow Mechanical Pencil Eraser

I like the tombow erasers because they keep their shape allowing for very precise erasing. I use this type of eraser on portraits. I don’t burn in the trace lines on portraits, so after I’ve gotten an area block in I erase the pencil marks. There are often pencil marks nearby that I want to keep, so precision is needed.
Amazon Link: https://amzn.to/3OyPyg4
 Ink or Sand Eraser

This photo shows a combination eraser that has both a pencil and ink side. This style is cheaper than purchasing one dedicated to ink. The links are to the dedicated ink erasers.
Ink / sand erasers can remove medium to light colored burn marks. Another feature is to use them to create a soft or subtle highlight by removing just a little color from the burn.
Amazon Link: https://amzn.to/3bxob7n
 Kneadable Eraser

I use kneadable eraser to remove excess graphite if I got my trace lines drawn on too darkly. I lightly rub the eraser over in one direction over the board. After 4-5 passes with the eraser, I knead it to get it clean and continue on. I doubt that one brand is better than another, but what I currently have on hand are the Prismacolor brand erasers.
Amazon Link: https://amzn.to/39Z64qM
 Vanish

I like the vanish eraser because it’s a bit more abrasive than a standard pencil eraser. It won’t remove burn marks, but it’s pretty good with stubborn pencil and white charcoal marks.
Amazon Link: https://amzn.to/3Adt3J4
 Electric eraser

I like using an electric eraser to quickly and precisely remove color from a burn. I often use it without turning it on because I like the small tip of the erasers. The erasers don’t lose their shape like the ink / sand eraser does.
My electric eraser is made by Sakura, and it’s old. Many, many years ago when I researched getting an electric eraser, this one received very high ratings. Plus, it was rated excellent for heavy duty use. I can’t promise this is still true, but it still gets good reviews.
Amazon Link: https://amzn.to/3AeZ6s8
 You must use sand / ink erasers for this to work on wood. This is not something that comes with any electric eraser that I’ve seen. I found this box on Amazon for around $7 USD.
Amazon Link: https://amzn.to/3a3DTXz
NOTE: As of June 30th, 2022 I am aware that this product is out of stock on Amazon, and they don’t have an idea of when it might be back in stock.
I found numerous listings on Ebay for this product, but now it’s closer to $30. There were options to buy several boxes, and that dropped the price down. I recommend doing a search to see if someone has a deal. Ebay Link: Ink Eraser Refill
 I did find this small set on Amazon that includes both pencil and ink eraser refills. The dark grey refills on the right are the ink eraser.
Amazon Link: https://amzn.to/3yvdDi1

Spot Sanding Pen
Another eraser or type of eraser I use is a spot sanding pen. This is made out of fiberglass and is very, very abrasive. This eraser is another one that keeps a small tip, so I can remove color in a fairly controlled fashion. I will admit that since i’ve found a pyrography suitable refill eraser for my electric eraser, I seldom use the spot sander. There are 4 reasons for this.
1. The spot sander creates fiberglass dust, and I’m sure that’s not good to breathe in.
2. A box of refill erasers is cheaper than 1 spot sander. (not anymore)
3. The refill erasers are smaller, so I can get more precision out of them.
4. Spot sanders are geared for removing rust of automotive parts, so they are extremely abrasive. It is very easy to create gouges in the wood; especially on softwoods and plywood.
Be aware that these tend to fluctuate in price quite a bit on Amazon, so I’d recommend doing a search to see who is selling it the cheapest. Also, I think you can get these in stores that sell automotive parts. Amazon Link: https://amzn.to/3RxT2kk
I do have a blog where I compare the different erasers to see how effective they are at removing burn marks. Pyrography Erasers
FINISH / SEALANT
I personally prefer a matte finish because I don’t like reflected light interfering with viewing the artwork. Matte finish isn’t always available, so the next best thing is Satin finish. I won’t use semi-gloss or glossy finish, but that’s a personal preference. Also I would check with your local home improvement store and purchase finishes they as are likely to carry several brands in an assortment of sizes and finishes. Plus it might be cheaper.
Note: There are many, many brands of finish. I’ve only listed Minwax, because I know Todd uses it. Part of that is because that is what is available in my small town. Please don’t ask me about other brands, which one is best, etc., because I don’t know. I figure they must all be fairly similar otherwise the big stores wouldn’t carry them.
 Lacquer. The nice thing about lacquer is that you don’t have to sand between coats. I couldn’t find matte finish on Amazon, so the links are for satin. Amazon Link: https://amzn.to/3QRxjUy
 Polycrylic. Polycrylic finish is easier to find with a matte finish than lacquer. The drawback of this finish is that you need to lightly sand between coats. Also it has a slight plastic feel to the finish. Amazon Link: https://amzn.to/3OyQnFG
LAMP
 I recently found switched over to a new light system called the Duolamp. It has two arms that you can move around and 4 different brightness settings. It uses LED’s, so doesn’t get hot. That’s important for me because if I’m burning for any length of time, the heat from the lamps I used would make my burning area warm. I’m hoping that the new lighting will help improve my videos as I’ve had a couple of people tell me the images were a touch dark.
I got the table lamp, but it’s not very tall. I have to put it up on a stand so that the arms are above my easel, but I do have a large easel; it’s over 20 inches tall (50.8). They have a clamp on version and in hindsight that probably would have worked better for my situation. They also have a floor model, but I knew that wouldn’t work for me.
Amazon Link: https://amzn.to/3I11VyQ
LEATHER
 Only burn on unstained vegetable tanned leather! Keep in mind I am not a leatherworker. It is something I’ve started dabbling in because I like the concept of functional art.
I buy my leather from Tandy Leather as they are the only leather store semi-close to me. I’ve done some searching and they have good prices. They often have “special purchase” leather that is really cheap, and I’ve discovered there is a reason. When burning I keep getting waxy spots that emerge. I don’t know what it is, but I think it’s called bloom.
With my order I chose to purchase leather in their Craftsman Oak series. Covid was raging at the time, so I had to order online. I asked them to send me something that was very pale because I planned to use it for pyrography. They sent a wonderfully pale hide, and I was very pleased! Another feature I liked was that the flesh side was smooth; unlike the special purchase leather. I’ve since learned that if the flesh side is rough, then the leather wasn’t processed very well. Most importantly I haven’t had any issues burning on the Craftsman Oak series.
By the way I used my personal email information instead of my pyrography one, so they didn’t know I have a website or youtube channel. I avoid getting preferential treatment because I want to see the product they send to the average joe blow. In fact, I do this with all of my supplies.
 Lastly, I want to mention that I’ve found Weaver Leather Supplies’ youtube channel to have lots of valuable information for those just learning; like me. That’s where I learned about rough flesh being a sign of a poorly cured hide. Weaver Leather YouTube
MISCELLANEOUS
 I didn’t know what category to put this under. I’ve been using this heat gun to do background work. It has a temperature dial to control how hot it is. There is also an air output dial.
 This machine was able to fill in a 2 inch square grid in almost half the time I could burn it with a pyrography machine. The image to the left shows a test grid I did. The far right grid was done with my Colwood burner and it took me 8:14 minutes. The far left grid was done using the square attachment on the heat gun and it took me 3:23 minutes to do.
I wouldn’t use this for areas that precision is needed, but it’s great for soft edges or out-of-focus work.
Note: As of June 30, 2022 I’m working on a review, but I’m still doing some testing. I’ll update this section with a link to the review once I get it done.
Amazon Link: https://amzn.to/3QZq0KE
MOUNTING BOARD
 I use a mounting board if I’m working with paper or small pieces of leather. I secure the paper to the board to keep the paper from buckling. I choose a scratchboard versus hardboard because I’ve had tape remove top layers of the hardboard.
Also, the ampersand brand is archival, so I don’t have to worry about it altering the acid-free qualities of the paper. I secure the paper to the board by taping down all of the edges. I use white acid-free artist tape for this (there’s a link in the tape section).
With leather, I make a loop of tape and place this on the back of the leather. Then I press it down onto the board. A loop of tape is made my taking a 4-6 inch piece of tape and making a circle. The sticky side needs to be on the outside of the cirlce.
Amazon Link: https://amzn.to/3OQkKqH
PAPER
Burning on paper is a bit more difficult than wood, and it’s a lot harder to fix mistakes. On the flip side, paper comes in a wide range of sizes. Is easy to store and frame. You don’t have to do anything to get the paper ready for burning; unlike wood. Paper is cheaper to ship, and you don’t need to seal it. Lastly, 1 sheet of paper is often cheaper than a similar sized piece of wood.
NOTE: Make sure to get hot pressed, 100% cotton paper. The hot pressed surface will have a smooth texture and that allows for finer details to be created. If it isn’t 100% cotton or rag then you will have problems with it fading and/or discoloration over time.
 Winsor & Newton 140 lb is my current favorite paper to burn on. I couldn’t find this on Jerry’s site, so provided a link to Dick Blick.
Amazon link: https://amzn.to/3yv0NAw
 Legion Stonehenge Aqua 140 lb isn’t a bad paper to burn on. It’s not as good as my favorite, but it’s cheaper.
Amazon Link: https://amzn.to/3ntPLoY
PAPERS I DON’T LIKE
Papers I’ve tried and haven’t much cared for: Cartridge paper, Lanaquarelle, Fluid Speedball, Meeden Baohong, and Strathmore 500 series. As I try burning on more papers I’ll update this section.
PENCILS
I wouldn’t have included this section other than I’ve been asked about it. For pyrography any pencil will work, so don’t spend a lot of money.
 I use a mechanical pencil with a 0.5 mm lead for tracing patterns. I like the fine point that I never have to sharpen. I don’t know the brand I use, but I can tell you it was something super cheap. I’m not creating art with it, so it works just fine for my purposes.
I like to use HB leads because it tends to be soft enough to produce a nice dark mark, but firm enough so it doesn’t break.
I personally don’t like the lead larger than 0.5 mm, and the smaller leads break too easily for tracing purposes. I will tell you now that the link is to the first pencil on Amazon and it looks to be much nicer than what I use. 🙂 Amazon Mechanical Pencil
 I use graphite pencils that are in the B-6B range for coating the back of patterns.
Pencils sets include a number of pencils in the H range which are too light for coating the back of patterns. Ironically sets are much cheaper than a box that contains just one tonal value.
The set I found is extremely cheap, so I’m sure they are very low quality. Again, all we’re doing is coating the back of patterns with them. Even tossing out all of the H range pencils, this set is still cheaper than a box with one tonal value. Amazon Cheap pencils
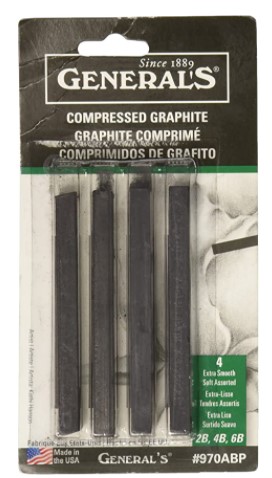 Compressed Graphite Sticks are great for quick coverage of the page. I also love to use them when working with larger patterns; again because it’s so much faster than a regular pencil. Plus, you don’t have to sharpen them. The downside is that your fingers get covered with graphite. Since I hate that I wear rubber gloves when using these. Amazon Compressed Graphite
 I have recently started using pencil extenders to hold small pieces of the graphite stick. Small pieces are difficult to work with, so the extender solves that problem and I don’t get messy fingers. Amazon Pencil Extenders
PENCIL SHARPENER
 I like the Derwent mechanical pencil sharpener. It’s gets pencils, included colored pencils, extremely sharp. Hardware is included so It can be clamped to the edge of a table or desktop.
 Another pencil sharpener I really like is the Mobius & Ruppert sharpener. This little sharpener is very sturdy, and can handle different sized pencil barrels.
I couldn’t find the exact same version I have of this sharpener on Jerry’s, but they have a side-by-side one that does the same thing.
PRINTER
 Epson workforce WF-7620 is the printer I use. I picked this specific printer because it can print ultra large up to 13×19 inches and scan up to 11×17. I don’t use the large sizes often, but on occasion I do. For me scanning is important because I create patterns; otherwise, I wouldn’t care.
Amazon Link: https://amzn.to/3a0qlfC
I bought this print several years ago and it has been discontinued. Now the printers available are either used or obscenely priced. I think I paid around $400 USD, and now they are almost double.
What would be a good substitute? I couldn’t begin to tell you. Instead I would direct you to an article by Good Housekeeping. I have not read the article as I’m not in the market for a printer, but good housekeeping has a good reputation and that’s why I picked them.
Good Housekeeping 2021 Printers
SAND PAPER
 I use 220 grit sandpaper to prep my boards before burning them. I have no idea what brand I’m using, but I doubt it really matters. Also, some people like to sand their boards with a higher grit to get a smoother finish. There’s nothing wrong with that.
The only problem I’ve ever experienced was a guitar fretboard that Todd had sanded to 1000 grit. It was so smooth that I couldn’t get pencil marks to adhere to the surface.
Amazon Link: https://amzn.to/3y5uwia
Some people use sandpaper to remove and/or fix mistakes. I seldom do, but that is only because I don’t feel like I have much control with the paper. Or to put that another way, I have troubles being precise with the sanding.
 I’ve seen some artist on youtube who use sanding sticks or twigs. I haven’t used them, but they do look intriguing.
Amazon Link: https://amzn.to/3y5knSv
SCRAP WOOD
 I always keep a piece of scrap wood by or on my easel. Sometimes I use it to elevate the artwork so that it’s easier to burn along the lower portion. As you can see from the photo, my piece of scrap wood gets a lot of use. I blot my pen tip on it after pauses in burning. This removes any excess heat and helps prevent dark burn marks from appearing.
SCRAPERS
I use scrapers to create highlights, whiskers, and remove mistakes.
 The Xacto knife is probably my most used scraper. I use the standard #11 blade because the fine point allows precision to create whiskers, fine highlights, and remove small burn mistakes. The link for amazon is a set that comes with a number of replacement blades. I use my knife so often, that I change blades about once a month.
Amazon Link: https://amzn.to/3bC1WgD
 A utility knife is my large scraper. If I’m using this then I’ve made a major mistake or decided to make a huge revision.
I don’t use the cutting edge of the blade. Instead I use the blunt non-cutting end that the green arrow is pointing at. Also, I get the really cheap ones that have scored blades that you can break off. I couldn’t find anything but a box of the cheap style I use online, but I’m sure that a home improvement stores sell them.
Amazon Link: https://amzn.to/3I4YsiL
TAPE
I use tape secure reference photos and/or patterns to the board for tracing, and I use tape to secure paper to a mounting board to keep it from buckling.
 First aid paper Tape is what I use if I’m working with leather or paper. The tape is low tack and won’t mar the surface of either the paper or leather when you remove it.
Amazon Link: https://amzn.to/3udwDiC

This image shows the damage regular tape, like scotch tape, did to my watercolor paper when I removed the pattern. That’s why I only use the first aid paper tape on paper and leather.
 Scotch tape is what I use on wood. Just make sure not to burnish (rub over) the tape as it might damage the board. I know several people prefer to use painters tape; this a great idea and one I haven’t implemented yet.
Amazon Link: https://amzn.to/3xYoCze
 White artist tape is what I use this tape to secure paper to a mounting board. It is acid-free and forms a good strong seal. I have had problems with it marring the paper upon removal, but that usually happens because I had the paper secured for a long time.
Amazon Link: https://amzn.to/3bGTbBR
TORCH
 I occasionally use a mini torch to burn borders on my boards. I don’t do this often because I’m terrible with it. I’ve caught my easel on fire using this torch!
I have a bernzomatic and I’m not overly thrilled with it because it runs out of fuel very quickly! Mine can be used as a soldering iron, so is okay for doing more than lighting a candle or the bbq grill. I couldn’t find the one I use, so I’m providing a link to the “best seller” brand of soldering iron torch on Amazon. Whether or not it’s any good I can’t tell you, so if you want a torch I recommend doing your research.
Amazon Link: https://amzn.to/3AgTjCv
TRACING PAPER
I don’t use tracing paper.
I kept buying different brands to try out and I hated them all. Either they were to light to see well or they were so dark I had problems erasing them. I quit wasting my money and use my tried and true method. I coat the back of the pattern with graphite and place the graphite side down on the board. Then secure the pattern with two pieces of tape, and proceed to trace over the pattern.
WATERCOLOR GROUNDS
 This is a great product to use if you want to use watercolors on wood. Without this watercolor, inks, markers, etc., behave like stains. By that I mean that they instantly penetrate the wood instead of floating on the surface. Brush marks don’t blend.
I should mention that there are other brands of watercolor grounds. This just happens to be the one I tried.
Amazon Link: https://amzn.to/3bEVZjc
WHITE CHARCOAL
 I use white charcoal to mark areas that I want to avoid burning over. The white charcoal is easy to see and it erases easily.
![]() Don’t leave white charcoal sit on the board for more than a couple of hours at a time. Much longer and as it starts to bond with the wood becoming difficult to erase.
Don’t leave white charcoal sit on the board for more than a couple of hours at a time. Much longer and as it starts to bond with the wood becoming difficult to erase.
There are many brands available, but I’ve only used Generals and Conte. Generals is easier to find and cheaper, so that’s the link I’ll provide. Jerry’s and Dick Blick only sold sets that included black charcoal, so I didn’t bother with them.
Amazon Link: https://amzn.to/3a3GFfq
WOOD
My preference is solid wood. In order of preference I like basswood, maple, and poplar. I will burn on plywood because it’s readily available and a lot cheaper than solid wood. My complaint with plywood is the texture and the fact that it doesn’t age as well as solid wood. I’m sure that has to do with the fact that glues are involved.
While I was researching some information for a community post on YouTube, I came across a company, Ocooch Hardwoods, that sales basswood online. They also sale maple and poplar. They sale it in one foot lengths by various widths, and the prices were too bad. I haven’t worked with them, so I don’t know how good their service is. Ocooch Hardwoods
BASSWOOD
 Basswood is my favorite to burn on. It’s a pale wood and doesn’t tend to have a lot of grain lines. If you do not live in the USA, then basswood will be called something else. In some places it is called linden, common linden, and common lime (no relationship to lime fruit trees).
I buy mine at an exotic lumber store in Portland, Oregon. The store sells it as rough boards, so Todd has to do a bit of work to get them useable for me.
If you have a lumber yard or exotic wood store check with them to see if they carry it or maybe they would be willing to have some brought in for you. Be aware at the time of writing this (April 2021) lumber prices are really high and some items aren’t available.
Amazon and craft stores sell basswood planks. Usually you’ll can find planks with and without bark on them. Amazon Link: https://amzn.to/3OzRIft
Basswood panels are another option. They are technically a plywood, but the ones made by Ampersand are artist grade. I’ve found them to be of good quality. They have a nicer surface texture and they age much better than regular plywood. FYI – You have to scroll down past the cradleboards to get to the panels. Jerry’s Artarama Bass Panels
MAPLE & POPLAR
While I like burning on both of these woods, they are something I buy a lumber stores. Yes, you can buy lumber online and have it shipped, but the freight gets expensive. Plus as I mentioned before lumber prices are really high right now. I did provide a link to an online website that ships wood (see above section for Basswood).
PLYWOOD
 Plywood. Plywood tends to be inexpensive when compared to solid woods. Be aware that plywood doesn’t age well. By that I mean it tends to yellow or darken over time and the artwork gets harder to see. The art boards are better in this regard, but the tend to be expensive; often costing more that solid wood.
Also, I don’t recommend using anything thinner than 1/4 inch because it is prone to bowing and buckling. Even 1/4 inch might buckle or bow. I provide links to 1/8th inch because they are much cheaper, but I recommend turning them into a cradled board.
B/BB grade. B = decent. BB = not so decent
12×12 x ¼ (pack 12) Amazon Link: https://amzn.to/3nsYac1
12×12 x 1/8 (pack 12) Amazon Link: https://amzn.to/3R259pV
A = nice surface
12×12 (16 pack). Unfortunately the only one I could find are very thin (around 1/8”) Amazon Link: https://amzn.to/3nqjT4j

If you have problems with thin wood bowing, then attach it to a wooden frame base. This image shows a cradled board that can be purchased at art supply stores. It is nothing more than a piece of plywood with a wooden frame base. Depending on the brand, the plywood is much better quality than what you will get at home improvement stores or the listings I provided for Amazon.
I do have a blog where I tested out different brands of cradled boards. I do recall that Ampersand was my favorite from the initial round of testing. I’m still doing the second round of testing, so I haven’t updated the blog to reflect what I thought of the boards after I burned artwork on them. Cradled boards
IN CONCLUSION
That is it for this blog. I know I didn’t provide any great or grand information, but I do hope that having a list with links on where to get supplies is helpful.
Brenda
Apr 16, 2021
Want to subscribe?
- Click on the “Leave a Comment” field at the end of any post (blog) and a subscribe option will appear.
- Put something in the comment field (if you put “test” or “just subscribing” I won’t make your comment public)
- Fill in the sections for your email address and name, and then click on the “notify me of new posts via email.”
- You will get a confirmation email from WordPress confirming you want to subscribe.
- Click on the confirm button in that email and you’re done.
Please note that I do not send out emails. If you have a WordPress account there is a way to subscribe within the WordPress system, but I cannot provide specifics on how it works as I don’t know.
Miss Brenda,
Hello, and Happy Belated New Year!!! I’m very new to pyrography, and to your channel (<1mo.). You were one of the very first channels I found to help me understand this craft in depth but, you are the only one that’s actually taught me valuable information, and have motivated me to start my journey in wood burning. Thank you!!!
Since I’ve found your channel, I’ve binge-watched every single one of your videos already. You’ve motivated me so much so that I’ve ordered my Colwood-Super Pro II Kit w/ all of the RT-tips you use in your videos and/or highly recommend; (im)patiently waiting for it to arrive.
I have a few Basswood pieces of wood that I purchased @ Michael’s to start on as soon as my burner arrives; burning of a portrait w/ lettering & burning of outline of a country, carving w/ dremel the major body of water, and then filling it w/ resin. I’m still working on buying the remaining supplies (that pertains to my current projects) on this list that you’ve kindly shared with us… thank you, again!
You’re voice is so calming/relaxing, and your videos are extremely educational, informative, clear/precise, helpful, detailed, and your artwork is amazing! I just hope that I can recreate a fraction of what I’ve learned from you.
May I ask you a couple of questions? What type of pen (the “Zig – archival 5mm-red ink” one) is it that you use to trace your images for transfer? I can not find that pen that I took a screenshot of from another one of your videos, or anything that slightly resembles it online.
As for the pieces of Basswood that I purchased from the craft store, which is wrapped in clear-plastic (“lightly sanded”; per label), should I sand them prior to burning on them? I don’t want to forget to thank Mr. Todd for his awesome DIY videos as well… “Thank you, Mr. Todd!” I truly appreciate that the videos were designed for the average person, like myself, that’s not a woodworker or knows much about tools. I’ve convinced my husband to assist me in making the pen tips holder & the handheld sander… My only dilemma is that I need a holder that I can put away when not in use; I do not have my own craft space so I must pack up everything after every session. Does Mr. Todd have any suggestions on how to make a holder w/ a lid of sorts (hinged or cover)? I really hope to make the easel as well in the near future.
All your videos are so inspiring, and are extremely helpful to me! Thank you and Mr. Todd for all your hard work and dedication. Your videos are making a difference in my life, in sharing with me a new outlet to express myself, and the inspiration/motivation to do it to help deal with my medical conditions. Bless you and your family!
Hi Sorphea,
First off let me welcome you to the exciting artform called pyrography! I hope that you will enjoy it as much as I do.
I also hope that your burner will provide you many years of trouble-free burning as mine has. Now for the questions.
The red ink pen is OLD. I bought it when I was into scrapbooking, and I doubt it was cheap. You can use any red ink pen. This just happened to be the only one I have in my house.
Furthermore, I only use a red ink pen to take pictures with because graphite trace lines don’t show up well in camera.
Normally use a mechanical pencil because the point is finer. Keep in mind that you can use anything. Heck I’ve seen people use colored pencils, and embossing tools.
Sanded basswood wrapped in plastic. I always do the 4-step process on ALL wood regardless of manufacturer’s claims. That way I know I will be burning on an ultra-smooth surface.
4-step = sand, mist with water (board should be damp but not soaking), let dry, and sand again.
Now let me thank you for giving me an idea for a future blog and video the explains how to create an easy and portable pen tip holder.
Richy Coelho did a video where he used a block or thick sheet of Styrofoam to hold pen tips. If you cut the styrofoam down to fit inside a craft box, you now have a super easy portable holder. Numerous craft stores (like Michaels) carry little wooden boxes of various sizes. You just need to make sure the box is deep enough to easily fit the pen tips and the styrofoam.
Word of caution – make sure your pen tips are cold before you put them in the holder. Melting styrofoam can release some rather nasty and toxic fumes.
Thank you for the wonderful comment.
happy new year to you and your family.
B
Thanks Brenda for sharing your knowledge and expertise with us. I live in Ireland and I’m going to purchase the Colwood dual burner. I’ve made a list of the tips I’ll start with based on your information. My favourite tip was the use of the embossing tool for distant stars or mandala pattern. Always wondered how that was achieved. 🤗 Thank you
Hi Demelza,
Greetings. Glad my blogs are providing some useful information.
Thanks for the comment.
Brenda
Thanks for all of the information Brenda. I found it very helpful in prioritizing tool purchases. I appreciate all of the time you spend in educating us.
Hi Frank,
I’m so glad the blog was useful. It’s easy to amass a lot of stuff, but if it won’t be used then it’s just a waste.
Thanks for the wonderful comment.
I found a lumber mill that has 4/4 and 8/4 basswood at an excellent price but by the board ft. A friend of mine has a planer and its worth it to plane down to an 1/2 inch if necessary.
Awesome! I purchase my basswood at a ‘exotic’ wood story. They sell large thick boards of basswood, but they need a LOT of work to make them useable.
Grazie Brenda, x I tuoi consigli sei utilissima 👍👏👏👏continua così….. Sei bravissima e complimenti x le tue opere d’arte. Ciao
Sono contento che i miei blog siano utili. Grazie mille per il commento. Buona settimana!
Has anyone that you know of our some color on the Christmas tree? I would like to see any pictures out there before I commit
Hi Liz,
not that I’m aware of. I would recommend printing it out and adding color to the printout to get an idea of what it might look like. I almost always do that before I add color to anything.
Hi Brenda. Thank you for your blog! I learn so much from you! I am in South Africa and bought the Superpro2 international model directly from Colwood. Arrived here last year and I am very very happy with it. Been working for hours at a time with it. Your work is amazing and I learn so much from you.
Hi Alta,
I’m so glad you are enjoying the Colwood burner. I haven’t had any problems with mine and it’s gotten a lot of use. I hope you will experience the same!
Thank you very much for the wonderful comment!
Thank you for putting this out on the products you use. I found a few things that will really help. I enjoy your work and learn a lot every time. Thanks again!
thank you for the wonderful comment. Glad the blog was helpful